Pages

Showing posts with label preschool. Show all posts

01 September 2013

School Bag Packing List Keyring


Our house can get a bit chaotic some mornings. Trying to remember which bits are meant to go into which bag on which days was proving to be a challenge.

So I made up these key rings so that no matter who was packing, they could check off all the contents before leaving. Even better, Mr 6 could check the checklist and (fingers crossed) bring everything back home again at the end of the day.

So simple and quick to make. Using Word I wrote up a list of things the kids needed every day, and a second list of things they needed on particular days. I made them roughly rectangular in shape, and printed them out. I cut them out and put them back to back before laminating, cutting out, and using a hole punch and key loop to finish them off.


14 June 2012

Bottle Cap Stamps

I once saw an idea to stick foam stickers on bottle caps to make your own stamps. We didn't have any foam stickers left, but we did have the empty sheet that a set of foam stickers came on, so the whole family spent a happy morning chopping it up and sticking it in different shapes on bottle caps and then stamping with them. 


Speaking of bottle caps, I have a big teapot filled with lids which are used for everything from counting and sorting games, wheels on cardboard box cars, buttons on things that 3 year olds think need buttons, and even once as sushi on our very own sushi train. A wonderful versatile and free toy!

11 June 2012

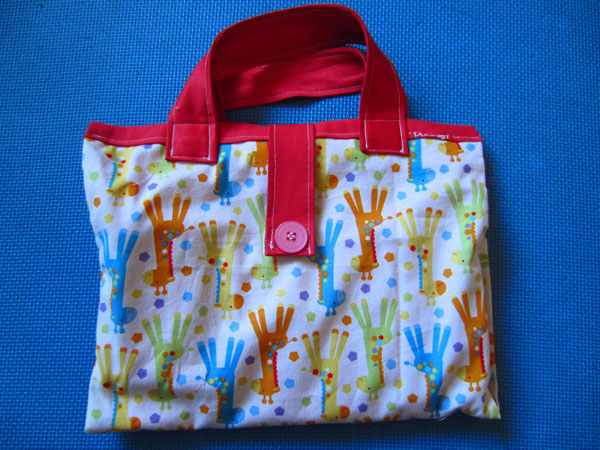
Crayon Bag

A carry bag I made for a set of Crayola dry-erase crayons and the black/white board they came with. The button is purely decorative, with velcro behind it. This is because it was a present for a 2 y/o girl, and I thought velcro would be easier for her to manage. Hopefully she won't mind that the giraffes are upside-down on the front of the bag!


07 June 2012

Target Practice


Such a simple little game, this peg catapult delighted the kids. I taped a bottle lid to a clothes peg, and then I taped the peg to a plate. We rolled up balls of paper, and made some target plates. All that took less than 5 minutes, and then I could make dinner while the kids played. 

The inspiration came from here.

06 June 2012

Hand Print Canvas


This hand print canvas is one of my favourite wall hangings. It is done with kids poster paint on a white canvas. The kids needed some paper to first learn how to put their hand down and take it straight off without smearing, and let's face it, once the paints are out and the hands are dirty it seems a waste to stop the fun after only 2 little hand prints.

Perhaps a good father's day gift idea for those in the northern hemisphere? It's also fairly light and easy to post to distant relatives.

05 June 2012

Sidewalk Chalk


Some more great times with sidewalk chalk. Both my kids have done their first great drawings and writing with the fat chalk sticks. Probably because it requires less fine motor control, and more fresh air. 

Our all-time favourite is a chalk road for bikes, trikes or scooters. I draw out a road, about a foot wide, with some intersections. If I'm feeling enthusiastic I'll add dotted lines down the middle of the road, traffic lights, (personalised) parking bays or a petrol station. If the kids are feeling in a drawing mood they'll add arrows, houses, pedestrian crossing, sweet shops. Once my son even drew a grocery shop, and then when he was writing the sign for it he asked me how to spell "very boring things shop". Sometimes we've drawn letters along the side of the road so they can sing the alphabet song while they're riding.


Sidewalk chalk is also good for life size portraits or hopscotch, or (a favourite of all the neighbourhood kids, but not so much of me) grinding the chalk up to make "fairy-dust". Although the fairy-dust game keeps the kids busy and industrious, and fairy dust is then good for making hand prints and foot prints on the concrete, it's also good for making hundreds of chalky footprints through the house!

I think the best thing about the sidewalk chalk roads and artwork is that they last until the next rain, and then you have a clean canvas to start you new creation.

04 June 2012

Travel Activity Book

I really wanted to make some wipe-erase activity sheets. I first bought wipe erase pens, but although they wrote well on clear folder pockets and smooth clear plastic, I found they wiped off very easily. This made the drawings (and little hands) very messy. Not to mention that the ink didn't wash out of clothes. Meanwhile they wouldn't wipe off laminated pages at all.

It wasn't until I heard about dry-erase crayons from Crayola and found a $5 packet of them at Target, that this idea really started to take shape.

The dry-erase crayons don't work easily on clear folder pockets (too much drag), but they do work well on laminated paper. Even better, they rub off quite easily with the cloth that comes with them, but don't rub off on your hand.

So then, time to make an activity travel book. I wanted something that would be suitable for planes, restaurants, the back of the car, rainy days, etc. so I made the pages A5 size.

I first started with some scenes that could be filled in with crayons or stickers. Miss 3 loves finishing a scene, wiping it off and then drawing it again. Especially if she has some company to do it with. Her favourite is the scene with the people, but I also included a space scene, underwater scene and a road. I used ripped paper, stickers and crayons to make them.

Quiet BookQuiet Book
Quiet Book
Quiet Book
Quiet Book


I then printed out some spot the difference puzzles (Mr 4's favourite puzzle at the moment), and I drew in some activities like a maze, thumbprints to make thumbprint doodles, and make-your-own sums in the left-over spaces. The crayons unfortunately don't show up fantastically on the red paper. The kids love mazes which are like streets with a different picture at each dead-end. And the maze lasts longer because they like visiting each object in turn. They are a little too easy for Mr 4, but that just means he tells me how they are too easy while he's busy doing them.


Next I put in the classic travel games: battle ships and close the square.


I also put in a blank page with a few other suggestions of games like tic-tac-toe or hangman that could be played there. I wrote the alphabet along one side to make hangman easier.


Finally I put in a home made plane scavenger hunt.

Edited to add: I have now made a plane trip scavenger hunt you can download for free from here.

Dry Erase Activity BookDry Erase Activity Book

I bound the book together using ring loops. This way I can change the pages to add things like my homemade i-spy pages (if I decide to add them in), new puzzles, new mazes or a page to collect stickers on. I can also take out the plane i-spy, and put in a car bingo etc.


03 June 2012

A Homemade I-Spy Book

I have been eyeing off the beautiful home made i-spy books like this one from Delia creates. I wanted to add some of my own home-made i-spy pages to the restaurant/travel dry-erase books I've been making, but when I'd finished the pages I put them in a $1 photo album and really liked it. Perhaps I'll laminate them and put them in the travel book later.


It was such a simple project. Just get a collection of toys, spread them out on a plain background so that you can see everything, and make a photo. I carefully didn't make them too cluttered and busy, because the kids find that too difficult and loose interest (see my post on i-spy bags). I then chose 5 or 6 objects to photograph, this time making sure that there was enough space around each object that I would be able to crop them into a smaller image. I then put them together with a little rhyme of up to eight other things to find.

Mr 4 likes to read the rhymes, and Miss 3 has the pictures she can match. The kids loved helping me do it. Although of course, true to the nature of children, the help made the project much more challenging. After printing I noticed that one of the search-for pictures showed a pram that Miss 3 had taken out of the dolls house to be play with at a crucial moment. The project took several days to make 10 puzzles (there was something about spreading out a nice collection of toys on the floor that meant they needed to be played with for a couple of hours). The last one we did, Mr 4 gathered all the things, spread them out and helped with the rhyme. He loved seeing his own toys, especially his sticker-reward chart, which was filled with all sorts of different stickers.

01 June 2012

Rice Play Tray


This is a great activity for a rainy day, or for when you want to make dinner without a couple of tired kids under your feet. Just get a baking tray, pour on a cup of uncooked rice, and find all your small diggers and tip trucks, tractors and animals. It usually ends up with a bit of a rice on the floor, but that's very easily swept up. And definitely worth it if it keeps the kids happily playing quietly.

27 May 2012

Outdoor Footprint Painting

From an early age, my daughter has loved to paint. And outdoors on a big piece of paper is definitely one of her favourites ways to enjoy it (I think because she's allowed to get paint on as much of her as she chooses). Even my son really loves it, despite the fact that he's never enjoyed getting messy. Take a big roll of paper outside, fill a tray with paint, and away you go. I also put out a clean bucket of water for my son so he can be in control of how painty he is. Great for hand prints, foot prints and even nappy prints. Just watch the foot prints, as paint underfoot can get very slippery. At the end it's just a matter of hosing down the ground and children. This is can be as much fun as the painting was!

25 May 2012

Simple Plane or Car Games


Here's a list of games I've collected (with our upcoming long-haul flight in mind), which are suitable for preschoolers in a plane or car or even in a tent on a rainy day. They should need nothing more than your body, or pens and paper (and the occasional piece of sticky tape).

Travel Games for Kids:
1. Odds and evens (pick odd or even, then stick out 1 or 2 fingers like scissors paper rock, count your fingers and your friends fingers to see if the total is odd or even).
2. Find 3 things starting with the letter…
3. I spy.
4. Thumb wrestling.
5. Stretch and wriggle. Find all the body parts you can wiggle.
6. Randomly select two body parts and try and touch those two body parts together. (Maybe make a spinning wheel with lots of body part names, or write lots of body parts down and close you eyes and pick, or get two people to choose one part each).
7. Try and guess who I am.
8. Write the alphabet, fill in an animal starting with each letter.
9. Write the alphabet, fill in a food starting with each letter.
10. Write the alphabet and find something you can see starting with each letter.


11. Draw a picture of things you might expect to see at your destination.
12. Draw a picture of a zoo.
13. Draw an outline of one or two people and then fill them in.
14. Draw an outline of a scene and then fill the picture in: a beach, the sea, a campsite, a garden, space etc.
15. Paper bag mystery. Put something in the spew bag and you have to try and guess what it is.
16. Guess the letter. One person closes their eyes, and the other draws a letter on their palm or back or foot. Could also be done with numbers or shapes.
17. Guess how many seats. Count them.
18. Hangman.
19. Naughts and crosses.
20. Close the square.


21. Make finger puppets.
22. Make a finger puppet movie.
23. Make paper clothes for a doll.
24. Make a puzzle (with square pieces).
25. Travel memory. Look at a plate of objects for 1 minute, then take the objects away and try and draw as many of them as you can.
26. Mr squiggle. Draw a few squiggles on a page and the other person has to turn it into a picture.
27. Make a scavenger hunt from a magazine.
28. Find something of every colour of the rainbow.
29. Find something in the shape of a circle, square, triangle, oval, rectangle, trapezoid, arch.
30. Tell a fairy tale from your head: 3 bears, Gingerbread man, 3 billy goats gruff,etc.


31. Tell a book from your head: any bedtime story you've told enough times to roughly remember by heart.
32. Make paper houses.
33. Make a mobile phone or robot out of empty fruit juice or dried fruit boxes. 


Mom's Mini Van and this site have heaps more travel game ideas.


Do you have any other good travel games?

24 May 2012

Suncatchers

Once again I was inspired by one of my favourite blogs, MiniEco. This time we made sun catchers. The kids had a great time, although didn't always get the concept of gluing things on the back-side of the black paper, and Miss 3 struggled with the idea of covering the holes, preferring instead to glue paper around them. But we all had fun doing it. The kids also loved it when I cut out their names, and filled them with different colours. We used a combination of tissue paper and cellophane, because that's what we had in house.

21 May 2012

Fairy Wings

I made Miss 3 some fairy wings a year or two ago. I think they were super sweet, made out of old lace curtains with red edging. I used some wire to give the wings shape. Unfortunately the wire didn't have memory, so after a bit of playing or a car trip, the wings looked more like something that belonged to a butterfly that had been dead for a few weeks. Not that Miss 3 cared, but I felt it was time for some new wings.

I know you can buy fairy wings very cheaply in the shops these days, and I know Miss 3 loves the girly pinks and purples and sparkles that they tend to come in but they're not really in my taste and, if I used things I already had lying around, the homemade option would be cheaper.
Butterfly Wings
Soft Fairy Wings
First I made Miss 3 a pair of butterfly shaped wings (with upper and lower wings). However I didn't take any photos of how to make them, because I was making it up as I was going and I wasn't sure how they'd turn out. Mr 4 then wanted to join in the fun, and so he ordered some wings with only one round wing either side.


How to Make Soft Fairy Wings

Make a pattern from paper, and cut out the shapes from your fabric (I used an old lace curtain) leaving a 1cm edge for sewing. The lace curtain was folded double for the set of wings in the left photo, and folded to 4 layers for the right set of wings. I found that wings that are roughly the size of a tabloid newspaper (double spread) to be a good size for the kids.

Sew the lace together, leaving a 20cm gap for turning it inside out and stuffing.
Cut a piece of wadding to size. I included an extra piece of wadding for the area between the shoulders, to give a little more strength and help the wings sit flat against the back. In the photo below the extra piece is a triangle, in the butterfly wings it was in a heart shape.

Turn the fabric so the hem is on the inside, and push the wadding into place. Sew the wadding in place using what ever pattern suits your fancy. I used straight lines and a rim around the edge for the wings in this photo, and some circles and tear drops for the butterfly wings. Tip: at this point I found the lace was tricky to pull into place for sewing, as it kept getting caught on the dog feed. If you put a piece of paper over the dog feed you can slide your fabric in place much more easily. Pull the paper out before beginning to sew. Alternatively drop the dog feed down while you feed the fabric into place.

Attach elastic shoulder straps using a zig-zag stitch. At the top edge, the elastic should sit approx. mid shoulder blade for the child. This helps the wings keep their shape (and makes it easier for the child to put them on). 

These wings are so soft that they can fit in the car seat, turn somersaults, and survive rest time, without getting uncomfortable or out of shape. I certainly have one happy little fairy!


20 May 2012

Homemade Wooden Jigsaw Puzzle


One day I was reading a board book to the kids about different tools, and trying to tell them about a jigsaw. Suddenly I decided the best (although perhaps not the quickest) way to teach them this was to make our own jigsaw.

I got a scrap piece of MDF, and we drew our pictures on in pencil. We each painted our own objects in the picture, and when the paint was dry, outlined the shapes with a black marker pen.

We took the picture outside and I cut it up with a jigsaw (while the kids mostly ignored me, except for occasionally asking me if it was ready yet). When it was all done, and dusted off, we got do do our own puzzle! 

It was a bit tricky to do as my inexperienced jigsawing made the pieces quite a loose fit, but that was definitely outweighed by the pleasure we had of making it ourselves.

19 May 2012

Cardboard Parking Garage

This is another one from the archives. Back when our house was filled with nappy boxes galore, and Mr 1 was obsessed with anything with wheels, I made this simple parking garage. I later made a wooden one which was more durable, but this nappy box garage was very very well used until then.

I took 2 nappy boxes, cutting them in half. On the top two box-halves the front wall was cut open, leaving an inch around the edge to give strength. The ramps are cut from each deck, and folded down to be sticky taped in place. The door at the bottom was cut only on two sides so that it could be lifted up. The whole thing was held together with sticky tape.

18 May 2012

Coloured Sand

This is one we made for a birthday present for a little boy who loves craft (although I made sure there would be some leftovers for us to play with).

We got some sand from the sandpit, and sifted out anything large. We divided it into five approximately equal amounts and put it in large freezer bags. We then added food colouring and shook the bags until everything was bright. We poured them into dishes to dry. Finally we bought some cheap salt and pepper shakers and added the sand, ready for making sand pictures.

We also did some coloured rice at the same time, using the same method.

As you can just see at the top of the photo, the kids had a very hard time keeping theirs hands away from it.

16 May 2012

Dora Castle Cake


I love birthdays and I love dreaming up birthday cakes. I was very pleased with how this one turned out. The base is made with 2 square chocolate cakes. I trimmed the side of the cake where the two cakes join to make them sit more neatly together, and then put one of the trimmed pieces as the bottom of the moat.

The castle is made with 1 rectangular cake cake cut into two matching squares. The squares went on top of each other. The trimmed off pieces were used to add to each side of the castle, so I ended up with a cube shape with missing corners where the towers needed to fit. 

The towers were made of small sponge rolls, and the two towers on the top were made from one sponge roll cut into two different length pieces. I dipped small ice cream cones in white chocolate and dusted them with sprinkles for the spires. (I used chocolate to stop the the cones from getting soggy, however they weren't very tasty so runny icing would have also done the trick). The flags were made by gluing some rectangles of pink wrapping paper to cooking skewers. The skewers were then pushed right through the cones and sponge rolls and cake to keep everything in place.

The left over white chocolate was spread on baking paper and I swirled a bit of pink food colouring through to get a marbled effect. I cut out a door shape from the chocolate when it set. The bridge was made from pink wafer biscuits. The whole cake was iced in a thin layer of butter icing, and decorated with tiny marshmallows, sugar flowers and M&Ms. The grass was sprinkled with coconut that had green food colouring rubbed through.

The birthday girl loved it (and so did Mr 4)!

15 May 2012

Butterfly Craft

I saw this being done at the local museum a while back, and adults and kids of all ages were all really enjoying it.
Draw (or trace) an outline of half a butterfly, with a dashed fold line down the centre.
Fold the paper down the fold line, and cut around the butterfly outline

Punch a hole in the centre of the fold line

Cut shapes from coloured paper and glue them on to decorate your butterfly. You could also use pens, paint, glitter, stickers, etc.

Take a chenille stick and twist it to give a finger-sized hole

Thread the legs of the chenille stick through the hole in the centre of the butterfly. The finger loop should be on the plain side of the butterfly.

At the head end of the butterfly, fold the chenille stick over the edge of the paper
Top side
Bottom side

Ready to fly!


Related Posts Plugin for WordPress, Blogger...