Pages

Showing posts with label painting. Show all posts

21 November 2013

Painted Wooden Spoons


So it's that time of year again. Time for craft and teachers presents. These are some spoons Miss 4 and Mr 6 painted up for teacher gifts. They had such fun doing it, and are very much looking forward to giving them to their teachers. Mr 6 is usually not a painter, but this is a project he really enjoyed.

09 September 2013

Tessellating Lions Canvas


The finished product of our lions tessellation canvas. Inspired by the lizards on Mrs Bearden's Art Room. Each child painted their own lion and then they were glued to the canvas. Let me know if you're interested in the tessellating lion, and I'll have a go at uploading it.

11 July 2013

Balloon painting


I'd never seen balloon painting before (I've since seen a beautiful caterpiller on Pinterest using balloon painting). Anyway I thought I'd share Miss 4 and my experiences with it.


10 June 2013

Paint and Pastel Self Portrait


This is a portrait Miss 4 did a while back (when she was 3) using the beautiful tutorial at Deep Space Sparkle. Such simple technique but I really love the results. We used poster paints instead of tempera paints (not sure if/what the difference is there) but it seemed to give us the right results.

The best things about this technique were: starting with a U shape (rather than an oval), using 3 circles for eyes, mixing the skin colour and then testing it by putting it on Miss 3's skin, and the look on her face when she'd finished.

23 May 2013

Super simple landscape painting


This is Miss 4's painting using the super simple tutorial from Creative Learning (found through here)

We did it together, but I actually liked hers better than mine.

There are just 3 simple steps:
1. Sponge on watered down blue (the tutorial said water colours but we used watery poster paints)
2. Use a playdough cutting wheel to paint on green stripes
3. Use a cotton tip to paint coloured flower dots on.

A lovely way to experiment with different ways of applying paint, and cute results.

24 March 2013

Painting Easter Eggs


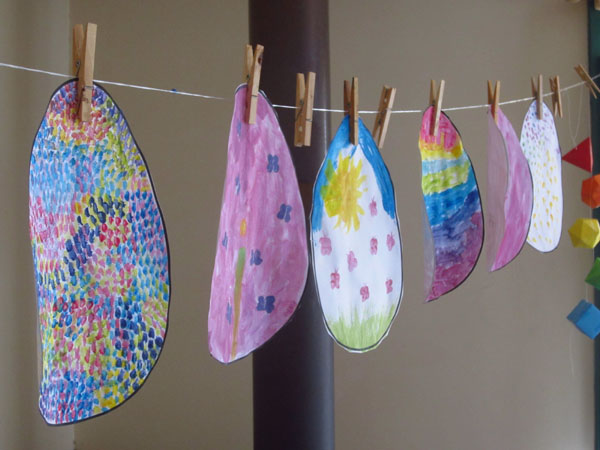
I blew about a dozen eggs for us to paint for easter this year. But when I took a look at them this weekend it turned out that I hadn't washed them thoroughly enough and they weren't too pretty. So I printed out an egg shape template instead, and the whole family spent about 2 hours painting them. Once they were dry we cut them out and hung them on a line across the corner of the room. Such a simple craft, but an excellent one anyway.


21 February 2013

Paint Powder and a Squirty Bottle

Ever since seeing something like this on Playschool, I've really wanted to try it. Such a simple and fun activity. Get some powdered paint (we had tempura paint) sprinkle it on the paper and squirt with water. Hang it up to dry. Fun!


Note: This is messy, so a great one for outside.

31 January 2013

Cotton Bud Tree Painting


Just a little painting fun. A few different ways to paint a cherry blossom tree or Jacaranda tree using only Q-tips (cotton buds). I'm sure the same could be done for an Autumn or Spring tree, if the colours are right.


Miss 3 thought it was great fun too.


And the usual way that Miss 3 finishes any painting time: some hand painting (followed by making some paint gloves for herself).


19 August 2012

Homemade Puff Paint

We've been a little light on the sharable kinds of craft here recently. I've been very busy making things for a fundraiser market, and the kids have been doing little side projects with whatever I've been using. But today I was searching for something to do at playgroup craft next week, and stumbled across this one, which I just had to have a go at. It's no good for our playgroup as we don't have a microwave there, but perfect for a quiet afternoon at home.


We made our own home made puff paint, using SR flour, salt and food colouring, according to the recipe from One Crafty Mumma. We made it into a sludgy paste, and painted on ordinary paper. We then put the painting in the microwave on high for 20 to 30 seconds. Magic! Dry, puffy paintings. The thicker you apply the paint, the more puff.


It even was interesting enough that it enticed Mr 5 to do not one but two paintings.

05 August 2012

Solar Fairy Night Light


I've been very busy recently with winter colds, children and making up some things for a craft stall for a fundraiser at our school. Mostly wings, but now I'm also working on some solar powered night lights. The one above was my first prototype and still needs some final touches, but perhaps you can get the general idea.

23 July 2012

Nature Printing

Miss 3 had decided to collect some things from the garden, and so I got out the paints so we could paint pictures of them. We put all our colours on the plate (red, yellow, blue, green and white) and carefully mixed the other colours we needed in order to paint the flowers she'd collected. As usual, as we painted the colours got slowly spread out, and mixed together and the hand painting started.


Towards the end of the hand painting, we had a tray of semi-mixed colours, and so we decided to do some prints of the garden things. I had been wanting to do this for a while after reading this post from 2 Craft and 2 Create. However I wasn't feeling enthusiastic enough to get cardboard to glue things on to and we had no paint rollers around. Instead we just pressed the leaves and flowers into the spread out paint on the paint plate, and pressed them onto the paper.


The leaves made a beautiful pattern (and quite different depending on which side of the leaf you used). The lavender made a pretty splodge and at the same time smelled fantastic.


01 July 2012

Travel Cars Mat

Plane Car Mat
These travel cars mats are something I made for a long haul flight a few years back. They were great on the plane; the little cars tucked securely inside when they were folded up, and they fitted easily on a little table or into a handbag. They were also great for other waiting times; at the doctors, at friends' houses etc. 


To make them I used some old curtains that had the white lining on the back. I hemmed them with bias binding, although the material doesn't fray, so hemming was just for looks. The bridges I made using fabric scraps sewed over some thin plastic (cut from whatever packaging rubbish we had in house). They're not super sturdy, but they do the job of getting the imaginations rumbling. 

I have a snap machine to put snaps on (which I bought way back when I was first pregnant and thought I'd be using in all my endless "free time" as a new mum making cloth nappies. Ha ha!). So I used snaps for the bridges, where I'm sure velcro would probably do the job. I put a couple of different configurations in, so that the bridges can be moved around.

The road I drew on with a permanent marker, and coloured in using water colour paints. I have seen some mums making beautifully sewn on roads. I like the quick and dirty option when available.

Plane Cars Mat

I finished with a loop of elastic sewn on at one edge, ready to keep it all together while it's travelling.


19 June 2012

Home Made Personalised Fairy Book (with free story)

Home made fairy book

Over the last few days Miss 3 and I have been enjoying making our own book together. The story is one I made up on request about a week ago, and then refined as she requested it a few more times. It's nothing fancy, but it suits my little want-to-be fairy. In fact Miss 3 came up with the book title and main theme of the book herself.

Originally I had plans of writing it out and drawing the pictures myself and then letting her paint in water colours on the pictures. But Miss 3 really wanted to write her own name into the right spots, and draw the pictures herself, which made it a lovely shared project.

I'll share the words here in case anyone else would like to make it, but isn't too keen on inventing a story themselves.

I took 5 pieces of paper, and folded them all in half to make a book shape (with 10 pages). Keeping the pages folded together (but not stapling them yet, so painting would be easier), I wrote the text on the left page, and Miss 3 drew on the right page. I added some borders for fun, and after painting and drying, stapled the finished book together. As a last step I covered the book in plastic contact, just to make it last a little longer.

home made fairy book

Here's the text, just replace the blanks with your own little fairy's name:

When ... Wanted To Fly 

Page 1
Once upon a time, there was a little girl called .... . More than anything in the world ... wanted to fly.

Page 2
Every day she put on her wings and jumped into the air as high as she could. But every day she would land *plof* back on the ground.

Page 3
One night, when all was dark and quiet, and everybody in the house was asleep, ... opened her eyes and saw a light shining beside her bed.

Page 4
When she looked closer she saw it wasn't just a light, it was a fairy!
"Hello!" said the fairy, "I'm your special wish fairy and I can grant you one wish for whatever you want."

Page 5
... didn't even have to think about it. She knew right away what she wanted most of all.
"I'd like to fly." she said.

Page 6
The fairy reached into her pocket and took out a handful of magic fairy flying dust. She sprinkled the dust all over ... from her nose to her toes.

 Page 7
Then the fairy took ...'s hand and together they flew out the window! They flew high up into the sky. Below her, ... could see all the tiny houses and the tiny streets with their tiny street lights.

Page 8
They flew around until it was very late. Then it was time to go home. They flew back to ...'s house, to ...'s room, and to ...'s bed.

Page 9
As ... lay in bed, the fairy tucked her in and gave her a tiny fairy kiss on the tip of her nose.
... fell asleep with a big smile on her face.

The End

13 June 2012

Cornflour Salt Dough vs Cornflour Soda Dough

Cornflour Clay

I wanted to try making cornstarch dough after seeing the beautiful mushroom and beads by 5 Orange Potatoes. Her recipe calls for equal parts cornstarch, baking powder and water, mixed with half as much salt. That seemed like a lot of baking powder to me, so I searched around and found another cornstarch dough recipe for 2 parts salt to 1 part cornstarch plus water.

I decided to try and make both.

I was feeling a little lazy and so I didn't look up if it should be baking powder or bi-carb soda. In retrospect it was probably bi-carb soda, but seeing as I had more baking powder on hand, I used that. In the same way I assumed cornstarch was equivalent to cornflour. 

Both recipes were dead easy to make. The kids adored that it was fresh, home made and they helped to make it. Even better that they could keep and paint their creations when they dried.

The recipe with the baking powder was an opaque white colour (and a little dry and crumbly, I think I'd try and improve that next time). The cornstarch and salt dough had a beautiful slightly translucent white colour to it. I had a tiny paper cut on my finger, and working with the salt dough was like (to use a phrase) rubbing salt into a wound. Not very pleasant. Miss 3 had no problems with it, but I worried about the fingers of Mr 4 who suffers from eczema quite badly. The recipe with baking powder was not a problem and nice to work with.

In the photo above, the pink mushroom and balls were made using the salt dough, and the dolls house kitchen accessories and smaller mushroom were made with the baking powder recipe.

06 June 2012

Hand Print Canvas


This hand print canvas is one of my favourite wall hangings. It is done with kids poster paint on a white canvas. The kids needed some paper to first learn how to put their hand down and take it straight off without smearing, and let's face it, once the paints are out and the hands are dirty it seems a waste to stop the fun after only 2 little hand prints.

Perhaps a good father's day gift idea for those in the northern hemisphere? It's also fairly light and easy to post to distant relatives.

29 May 2012

Handprint Table Top

One from the archives. Our coffee table needed a new top, and my toddler had some cute little toddler feet and hands just ready to make prints with. I started by painting the table top with an off white, then I put the prints on (with the help of said toddler). I then drew boxes around the prints and painted them in (light shade on two sides, darker on the third side and darkest on the forth side). Finally I finished it with varnish, and wrote a name and date on the underside. Nowadays it's not looking nearly so new, has a few scratches and pen marks on it, and regularly has glue and playdoh smeared into it, but I still enjoy seeing those little hands and feet.

27 May 2012

Outdoor Footprint Painting

From an early age, my daughter has loved to paint. And outdoors on a big piece of paper is definitely one of her favourites ways to enjoy it (I think because she's allowed to get paint on as much of her as she chooses). Even my son really loves it, despite the fact that he's never enjoyed getting messy. Take a big roll of paper outside, fill a tray with paint, and away you go. I also put out a clean bucket of water for my son so he can be in control of how painty he is. Great for hand prints, foot prints and even nappy prints. Just watch the foot prints, as paint underfoot can get very slippery. At the end it's just a matter of hosing down the ground and children. This is can be as much fun as the painting was!

20 May 2012

Homemade Wooden Jigsaw Puzzle


One day I was reading a board book to the kids about different tools, and trying to tell them about a jigsaw. Suddenly I decided the best (although perhaps not the quickest) way to teach them this was to make our own jigsaw.

I got a scrap piece of MDF, and we drew our pictures on in pencil. We each painted our own objects in the picture, and when the paint was dry, outlined the shapes with a black marker pen.

We took the picture outside and I cut it up with a jigsaw (while the kids mostly ignored me, except for occasionally asking me if it was ready yet). When it was all done, and dusted off, we got do do our own puzzle! 

It was a bit tricky to do as my inexperienced jigsawing made the pieces quite a loose fit, but that was definitely outweighed by the pleasure we had of making it ourselves.

09 May 2012

Water Colours and Ink

I've seen finished pictures like this before, but never quite knew how it was done. But a special birthday present was needed and so I thought it was time to give it a go.

I bought a permanent marker with a 1mm tip for the drawing, although Miss 3 pressed so hard with it, I could have chosen one with an even finer tip. I used some good quality heavy paper, cut it to size, and drew the border on. Then I gave the kids instructions to draw inside the border, and then to paint every bit of white inside the border.

For the paint I used watered down water colours. I could have perhaps made them less watery and achieved brighter colours. It was important to teach the kids to wipe the excess water out of the brush. I did want the colours to run together a little, but not with whole puddles on the paper.

Initially I tried to keep it to just primary colours (used for the bottom picture) but Mr 4 badly wanted green for the top picture.

I asked Miss 3 to draw her picture in lead pencil first (to make sure it was an interesting picture from an adult's perspective, not just a big scribble), and I had planned on drawing over her lines with the pen myself. Of course, being a very independent crafter, she ended up doing the pen herself. So in retrospect it probably would have been better to skip the pencil step.

Mr 4 wasn't in an arty mood and took a bit of convincing to get going, so I didn't push the point when he decided to only paint over his drawing rather than everything inside the border. Instead I let that be his artistic choice.

08 May 2012

Still Life Painting

Miss 3 loves to paint. She loves it so much, that most of her paintings are an effort to get as much paint on the page as possible, and then it quickly progresses to "finger painting" which is really whole handed smearing until everything is a homogeneous dark green colour. So this time I decided to try something different. First I sent her out to collect some flowers, and then we mixed up the right colours for those flowers, and away she went.

It really got her thinking about keeping the colours separate, and about the different parts of the flowers. 

She even went and got more flowers and had a second go, and only after that did she start hand painting. I'd consider that a big success.
Related Posts Plugin for WordPress, Blogger...