Showing posts with label glue. Show all posts
28 May 2013
Nature Rainbow Tree
A simple nice art activity. First we had a play outside and collected things of all the colours of the rainbow, plus some twigs.
I had thought we would just make a rainbow, but Miss 4 was quite determined it would be a tree. Just as determined as she was about the order of the rainbow; Red and yellow, pink and green, purple and orange and blue. I can sing a rainbow... I drew some lines to glue between and she did the rest.
But regardless of our differences in taste, it was a lovely art activity to do together and she was proud to show the results to Mr Crafty when he got home.
08 February 2013
Bejewelled Candle Holder
A lovely little activity. Use air-dry clay to make a candle holder and then stick jewels on using PVA glue.
We use a candle to encourage the kids to eat well at dinner (eat their vegies, use good manners etc.). Those who eat well get a turn to blow the candle out.
16 September 2012
Rose Headband
We had an artificial rose lying around, and I thought I'd make Miss 3 a new headband. Quick and simple. I made a tube of white satin to fit around some elastic (about 1.5 times as long as the elastic.) I turned it right side out and threaded the elastic into the tube. I sewed the elastic together and then tucked the ends of the satin in and sewed it together.
I sewed a small circle of white felt onto the satin (through the elastic). The felt bonds nicely with hot melt glue. I then cut the bottom of the rose off so it was flat, and glued it in place. A few of the layers of the rose seemed to be a little loose, and so I added some hot melt glue where ever it looked like it was needed.
09 September 2012
Paper Houses and Paddlepop Stick People
These were inspired by the finger puppets from Teawagontales and the free print out house pattern from Inner Child Fun (both via Crafty Crow). Our versions don't look as elegant, but were heaps of fun to make!
28 August 2012
Scissors, Paper, Holepunch.
I thought I'd share this one, not because it's a work of art. Far from it, just because it's some inspiration for a bit of happy crafting.
The idea is to cut paper into strips, punch holes in the strips, and then glue them to another piece of paper. I'm pretty sure I first saw something like this on Mr Maker. We used patterned scissors/pinking shears. And seriously, with scissors, hole punching and glue, how can you go wrong!
24 July 2012
Flower Glasses Brooch
This
little glasses brooch is a design that originated from my Grandmother.
She cleverly made one for herself years ago, using a brooch she had,
which conveniently had a loop that she could fit a key ring onto.
Unfortunately the brooch broke and was unrepairable, and she couldn't
find any new brooches that she could fit her key ring to. I thought that
sounded like a very satisfying little craft project and got to work.
The basic idea is a brooch with a small key ring loop that you slip one
leg of your glasses through, so that you can hang your glasses on your
shoulder and easily find them next time you need them.
The thing I like coming up with is the pretty bits. For this brooch I wanted to make a white flower.
First
I got some pretty white material. I cut a rectangle of the material
approx. 10cm x 15cm. I carefully melted the edges a little with a
lighter to stop it from fraying (taking care to not set anything on
fire!). I've worked with this material making a skirt a while back, and I
know how easily it frays.
Next
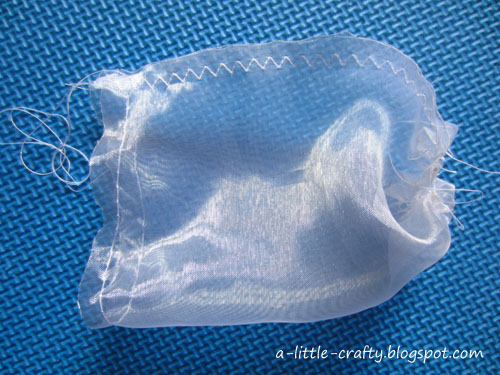
I sewed the two ends of the rectangle together with a zigzag stitch to
make a loop. I sewed in two running stitches at the top and bottom of
the loop (long stitch length and no doubling back to secure the thread
at the ends) to use for gathering .
I
turned the loop right side out, so the zigzag stitch was inside the
loop, and sewed another running stitch to gather the fabric across the
middle.
I
pulled the running stitches until the fabric was nicely gathered and
looking reasonably flowery, then tied the threads in a knot and used hot
melt glue to glue a button on top, securing everything in place.
Next
I took a length of white ribbon, just long enough to allow the key ring
to peak out from the bottom of the flower, and melted the ends of the
ribbon to stop it fraying.
Finally,
using a hot melt glue gun, I turned the flower over and glued the
ribbon (with ring) in place and the brooch pin over the top of it.
Finished.
16 July 2012
Simple Hairclips
More hot glue gun fun, and a couple of new hair clips. To make the flower clip it was a matter of roughly cutting out a flower shape from two matching colours, I used red felt and pink fleece (because I had them). I then trimmed the pink flower until it was a little smaller than the red, and then glued it all onto the clip with a matching button. Done!
To make the pink bow I simply folded the ribbon back and forwards a few times. I put a couple of quick stitches in to keep it firm. Finally I wrapped it around the middle with the tail end of the ribbon and glued it all in place. Too easy.
12 July 2012
Ruffled Flower Hair Clip
This week I finally bought myself a hot glue gun. So much fun! As soon as I got home I made some new hair clips for Miss 3. This one was made using this tutorial. It was dead easy.
I used a shiny slippery material that I knew (from making the ruffled skirt) frays really easily. So I started by gently melting the edges of my circles with a lighter. I have found from clips I've bought that hot melt glue can sometimes not stick well to shiny metal surfaces, so I then wrapped a short piece of ribbon around the clip and glued it in place, to help everything stick more firmly. After that I just followed the instructions in the tutorial, folding each circle into quarters and gluing it in place.
11 July 2012
Weather Collage for a Story Box
This time our inspiration came from Inner Child Fun. Miss 3 took one look at their lovely spring branch picture and said "I'd like to do that, can we do that, please?"
So we started with a sunset picture.
And a green leaves picture. With pink mountains.
From there she got more creative, with a rainy sheep picture and a couple of snowy pictures.
24 May 2012
Suncatchers
Once again I was inspired by one of my favourite blogs, MiniEco. This time we made sun catchers. The kids had a great time, although didn't always get the concept of gluing things on the back-side of the black paper, and Miss 3 struggled with the idea of covering the holes, preferring instead to glue paper around them. But we all had fun doing it. The kids also loved it when I cut out their names, and filled them with different colours. We used a combination of tissue paper and cellophane, because that's what we had in house.
15 May 2012
Butterfly Craft
I saw this being done at the local museum a while back, and adults and kids of all ages were all really enjoying it.
![]() |
| Draw (or trace) an outline of half a butterfly, with a dashed fold line down the centre. |
![]() |
| Fold the paper down the fold line, and cut around the butterfly outline |
![]() |
| Punch a hole in the centre of the fold line |
![]() |
| Cut shapes from coloured paper and glue them on to decorate your butterfly. You could also use pens, paint, glitter, stickers, etc. |
![]() |
| Take a chenille stick and twist it to give a finger-sized hole |
![]() |
| Thread the legs of the chenille stick through the hole in the centre of the butterfly. The finger loop should be on the plain side of the butterfly. |
![]() |
| At the head end of the butterfly, fold the chenille stick over the edge of the paper |
![]() |
| Top side |
![]() |
| Bottom side |
![]() |
| Ready to fly! |
14 May 2012
Cut and Paste People
Never underestimate the appeal of cutting up a piece of paper and sticking it on other piece of paper.
On this occasion we cut parts of people out of an advertising flier and Miss 3 stuck them together on a plain piece of paper.
07 May 2012
Making a Tree
This is such a simple and satisfying craft activity. So much so, that this time Miss 3 came up with the plan herself while we were out walking. Both kids collected leaves. I drew them a simple trunk shape on a big piece of paper, and then they spent a happy half hour gluing leaves on.
Subscribe to:
Posts (Atom)