

Showing posts with label flowers. Show all posts
Showing posts with label flowers. Show all posts
28 July 2013
Hammering Out Flower and Leaf Prints

28 May 2013
Nature Rainbow Tree

A simple nice art activity. First we had a play outside and collected things of all the colours of the rainbow, plus some twigs.
I had thought we would just make a rainbow, but Miss 4 was quite determined it would be a tree. Just as determined as she was about the order of the rainbow; Red and yellow, pink and green, purple and orange and blue. I can sing a rainbow... I drew some lines to glue between and she did the rest.
But regardless of our differences in taste, it was a lovely art activity to do together and she was proud to show the results to Mr Crafty when he got home.
31 January 2013
Cotton Bud Tree Painting

Just a little painting fun. A few different ways to paint a cherry blossom tree or Jacaranda tree using only Q-tips (cotton buds). I'm sure the same could be done for an Autumn or Spring tree, if the colours are right.


Miss 3 thought it was great fun too.

And the usual way that Miss 3 finishes any painting time: some hand painting (followed by making some paint gloves for herself).

16 September 2012
Rose Headband

We had an artificial rose lying around, and I thought I'd make Miss 3 a new headband. Quick and simple. I made a tube of white satin to fit around some elastic (about 1.5 times as long as the elastic.) I turned it right side out and threaded the elastic into the tube. I sewed the elastic together and then tucked the ends of the satin in and sewed it together.
I sewed a small circle of white felt onto the satin (through the elastic). The felt bonds nicely with hot melt glue. I then cut the bottom of the rose off so it was flat, and glued it in place. A few of the layers of the rose seemed to be a little loose, and so I added some hot melt glue where ever it looked like it was needed.

03 September 2012
Flowers and Snaps
I have been wanting to make something like this gorgeous bathing cap from Llevo El Invierno for a while. I looked for some brightly coloured flowers, but just couldn't find any, so I got some plain white ones instead.




First the bathing cap. Because Miss 3 wears goggles, I decided the flowers all over would be a problem, so instead I put just 3. The white flowers with pink centres on a blue cap match the design on her new swimmers.


Next a t-shirt. I decided to make a flower garden with white flowers. First I laid out the ribbon until I was happy with the design.

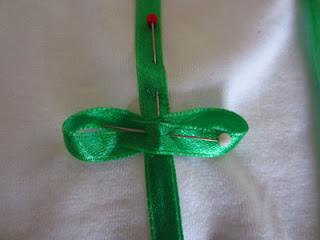
I made some leaves using ribbon wrapped in a figure 8.

I wanted to put some buttons in the centre of the flowers, but I find sewing buttons on to be a pretty tedious job, so instead I decided to use up some snaps (the ones I bought years ago to make my own cloth nappies... in all that spare time I imagined I'd have with only a newborn baby to look after.)

I chose a couple of bright colours and pressed them on. T-shirt done.


And then I found the coloured flowers I wanted, so I made a couple of bright shirts. I cut a branch shape from scrap material, sewed it on (first with straight stitch and then with zigzag, I found this was easier to keep it in place). Finally I pressed some bright snaps through the centre of some flowers. It took me about an hour to make these two:


24 July 2012
Flower Glasses Brooch

This
little glasses brooch is a design that originated from my Grandmother.
She cleverly made one for herself years ago, using a brooch she had,
which conveniently had a loop that she could fit a key ring onto.
Unfortunately the brooch broke and was unrepairable, and she couldn't
find any new brooches that she could fit her key ring to. I thought that
sounded like a very satisfying little craft project and got to work.
The basic idea is a brooch with a small key ring loop that you slip one
leg of your glasses through, so that you can hang your glasses on your
shoulder and easily find them next time you need them.
The thing I like coming up with is the pretty bits. For this brooch I wanted to make a white flower.
First
I got some pretty white material. I cut a rectangle of the material
approx. 10cm x 15cm. I carefully melted the edges a little with a
lighter to stop it from fraying (taking care to not set anything on
fire!). I've worked with this material making a skirt a while back, and I
know how easily it frays.

Next
I sewed the two ends of the rectangle together with a zigzag stitch to
make a loop. I sewed in two running stitches at the top and bottom of
the loop (long stitch length and no doubling back to secure the thread
at the ends) to use for gathering .
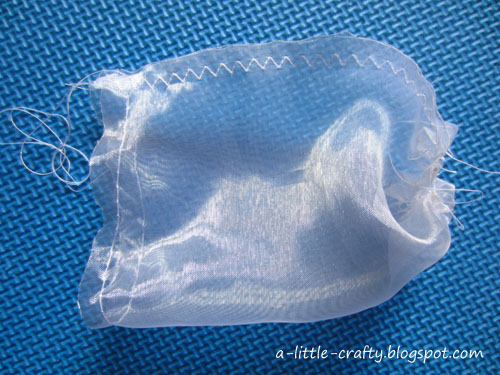
I
turned the loop right side out, so the zigzag stitch was inside the
loop, and sewed another running stitch to gather the fabric across the
middle.

I
pulled the running stitches until the fabric was nicely gathered and
looking reasonably flowery, then tied the threads in a knot and used hot
melt glue to glue a button on top, securing everything in place.

Next
I took a length of white ribbon, just long enough to allow the key ring
to peak out from the bottom of the flower, and melted the ends of the
ribbon to stop it fraying.
Finally,
using a hot melt glue gun, I turned the flower over and glued the
ribbon (with ring) in place and the brooch pin over the top of it.

Finished.
23 July 2012
Nature Printing
Miss 3 had decided to collect some things from the garden, and so I got out the paints so we could paint pictures of them. We put all our colours on the plate (red, yellow, blue, green and white) and carefully mixed the other colours we needed in order to paint the flowers she'd collected. As usual, as we painted the colours got slowly spread out, and mixed together and the hand painting started.

Towards the end of the hand painting, we had a tray of semi-mixed colours, and so we decided to do some prints of the garden things. I had been wanting to do this for a while after reading this post from 2 Craft and 2 Create. However I wasn't feeling enthusiastic enough to get cardboard to glue things on to and we had no paint rollers around. Instead we just pressed the leaves and flowers into the spread out paint on the paint plate, and pressed them onto the paper.

The leaves made a beautiful pattern (and quite different depending on which side of the leaf you used). The lavender made a pretty splodge and at the same time smelled fantastic.

12 July 2012
Ruffled Flower Hair Clip

This week I finally bought myself a hot glue gun. So much fun! As soon as I got home I made some new hair clips for Miss 3. This one was made using this tutorial. It was dead easy.
I used a shiny slippery material that I knew (from making the ruffled skirt) frays really easily. So I started by gently melting the edges of my circles with a lighter. I have found from clips I've bought that hot melt glue can sometimes not stick well to shiny metal surfaces, so I then wrapped a short piece of ribbon around the clip and glued it in place, to help everything stick more firmly. After that I just followed the instructions in the tutorial, folding each circle into quarters and gluing it in place.

12 May 2012
Paper Flowers

I was decorating an outdoor space ready for a birthday party recently. We really wanted to hang some balloons but didn't have any on hand, and so we decided to try our hands at making something with paper instead. We wanted something that we could hang up and that would sway in the wind a little.
I had been looking at these beautiful paper tulips and thought that was a good place to start. We had two things to consider: that we only had white paper available, and how would we hang them? We decided a yellow flower center would look nice and add colour.
10 May 2012
Playing with Ice

This is a great activity for a warm sunny day. First we filled a couple of muffin trays with water. We put food colouring in the water, mixing up a slightly different colour for each hole (although the colours were difficult to see against the dark muffin tray, it did make them prettier in the water). We then collected a variety of small things from flowers and leaves to plastic toys, old shells and coins, and dropped one in each hole.
And then for the most difficult part of this activity: waiting for it all to freeze.

08 May 2012
Still Life Painting

Miss 3 loves to paint. She loves it so much, that most of her
paintings are an effort to get as much paint on the page as possible,
and then it quickly progresses to "finger painting" which is really
whole handed smearing until everything is a homogeneous dark green
colour. So this time I decided to try something different. First I sent
her out to collect some flowers, and then we mixed up the right colours
for those flowers, and away she went.

It really got her thinking about keeping the colours separate, and about the different parts of the flowers.
She
even went and got more flowers and had a second go, and only after that
did she start hand painting. I'd consider that a big success.
Subscribe to:
Posts (Atom)
