Pages

Showing posts with label children. Show all posts

16 September 2012

Nature Prints in Air Dry Clay


I had some air dry clay left over from another project and wanted to give some nature prints a go. I remember seeing them previously here. Now that I look at them and compare them again, I see that my edges are more rustic. But they were definitely fun to make, and should work nicely for a Christmas tree ornament or piece of jewelry. Next time I'd like to try this recipe for home-made air dry clay. Just as soon as I figure out what school glue is, and where to buy it.


Miss 3 also enjoyed this craft and had great fun making her own circles and impressions. We rolled a small ball of clay in our hands, and then pressed it flat using a milk bottle top. We put the leaf on the clay and again pushed it in using the milk bottle top. We poked a hole using a toothpick and then left them to dry.


Once dry they could be painted. They could also be used to make some interesting rubbing drawings.


09 September 2012

Paper Houses and Paddlepop Stick People


These were inspired by the finger puppets from Teawagontales and the free print out house pattern from Inner Child Fun (both via Crafty Crow). Our versions don't look as elegant, but were heaps of fun to make!


19 August 2012

Homemade Puff Paint

We've been a little light on the sharable kinds of craft here recently. I've been very busy making things for a fundraiser market, and the kids have been doing little side projects with whatever I've been using. But today I was searching for something to do at playgroup craft next week, and stumbled across this one, which I just had to have a go at. It's no good for our playgroup as we don't have a microwave there, but perfect for a quiet afternoon at home.


We made our own home made puff paint, using SR flour, salt and food colouring, according to the recipe from One Crafty Mumma. We made it into a sludgy paste, and painted on ordinary paper. We then put the painting in the microwave on high for 20 to 30 seconds. Magic! Dry, puffy paintings. The thicker you apply the paint, the more puff.


It even was interesting enough that it enticed Mr 5 to do not one but two paintings.

25 July 2012

Toilet Roll Doll's Dresses


The other day the kids wanted to make some dolls to act out some stories using the story box Miss 3 and I had made. We made toilet paper roll dolls, and I thought I'd share how I made their very quick and very easy dresses.

1. Cut a strip of paper from an A4 sheet, the full length of the sheet, and about 10cm wide.
2. Fold it in half.
3. Cut a small slit at one end, about the width you'd like the dolls arm to be. 
4. Fold the paper below the cut over, making a triangle, and sticky tape in place.

5. Slip the toilet paper roll into the dress to measure how far to make the arm cut on the opposite side, and then cut it.

6. Fold the lower corner over and sticky tape it in place, in the same way as before.

7. Cut a small scoop for a neckline.

8. Put the dress on the toilet roll, and draw a face on.

Mr 5 thought they needed legs too.

20 July 2012

Plane Trip Bingo 3, 4 and 5

Here are a few slightly trickier plane trip bingo sheets I've made and thought I'd share. They're free to download, although I do appreciate comments :). 

Here's a plane scavenger hunt of moderate difficulty I've made. Download it from here.


And a second hunt of moderate difficulty. Download the free printable from here.


Here's another slightly more difficult one. Download a free printable from here.


Or go to the other Plane Trip Bingo games. 


17 July 2012

Plane Trip Bingo 2


Here's another Plane Trip Bingo that's perfect for those weary times after a meal, but before your tray is cleared. Download the pdf Here.

Or go to the other Plane Trip Bingo games.

09 July 2012

Paperclip Chains


You can't get an activity much simpler than this. Paperclip chains (or necklaces or bracelets or houses) can be a pleasant way for the children to occupy themselves on a rainy day.


08 July 2012

Positive Affirmation Book


This year Mr 5 started school, and with that has come a blow to his confidence as he encounters his first real bullying. As a consequence he's been asking me to tell him good things about himself. I thought I could do one better than that and so I bought a cheap little pocket notebook, and sat down and brainstormed and wrote down as many positive traits as I could; everything from riding his bike, to having patience, to things he's told me he likes about himself.


Using a word processor I put each possitive affirmation in it's own little box, and printed them out and pasted them into the book. The title of the book is one we brainstormed together.

The super pleased look Mr 5 gave me when he worked out what I was doing, and when I'd finished it, definitely made it a worthy project to have accomplished.


josh-the-robot-cover-72ppi
By pure chance I picked out Josh the Robot from the library this week. It's a beautifully written book about being teased and bullied, written by Peter Rowe. And the robot makes it appealing to boys.


05 July 2012

Soda and Vinegar Colours


Another rainy day to fill with inside play. This time we chose a science experiment I saw on Homemade Serenity. The idea is simple, cover a tray in Bi-carb of Soda, fill some containers with different coloured vinegar and let the kids slowly drop the vinegar on the bi-carb.

They loved it! 

First (because we didn't have any eye-droppers in house) I taught the kids how to lift up liquid using a straw with their finger on the end. That's a nice little experiment in itself. I gave them two cups, one full of water and one empty, and asked them to try and fill the empty cup.

While they were doing that I set up the tray with bi-carb and vinegar. It was definitely something I wanted to supervise for, as there was a tendency to get a bit messy (it could be nice to do on a summer day outside).

Not only did they get to see the bubbling chemical reaction, but they could also experiment with colour mixing.


29 June 2012

Marshmallow Building

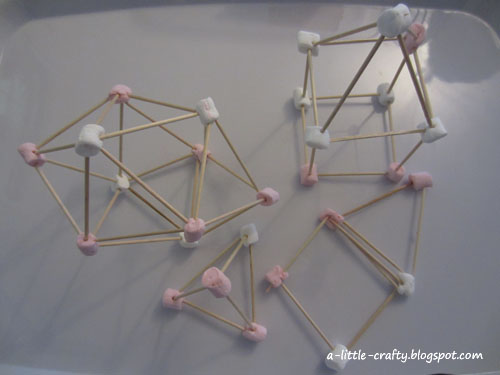
I've seen marshmallow and toothpick construction around a bit on the internet, and we just so happened to have some mini marshmallows in the house, a bunch of toothpicks, and yet another rainy day on our hands.

It was so much fun!

Marshmallow and Toothpick Constructions
The marshmallows were just sticky enough, and firm enough and yet pliable enough to make really satisfying structures.

I started with a tetrahedron (triangular based pyramid), and then a house, and then something else made from more triangles and satisfyingly symmetric.


Miss 3 at first struggled to get the hang of it. She managed to get a lot of cotton bud type constructions, and then, with a bit of help she made a 2-D house. With a bit more help she started on 3-D structures that (in Mr Crafty's opinion) didn't worry too much about the laws of gravity.

Mr 5 instinctively started making things with lots of triangles, and had no problem building something big and fairly stable. He struggled more with not eating too many marshmallows.

We kept the structures until after dinner, and then broke them up and ate desert at the same time.

26 June 2012

Woolen Snowflake


With the cold weather here we needed some indoor craft activities. I had some left over wool and thought it would be fun to make some snowflakes to decorate the room. After I made the first one, Miss 3 and Mr 5 decided they'd like to make their own. Miss 3 needed some help to hold it while she wound for the first half, and they both needed help to change colours, but once I wrote numbers on the sticks Mr 5 did really well winding by himself.

I started by putting a small roll of sticky tape between the paddle pop sticks to keep them in place. I then put a slip knot arond one stick and did a few cross overs in the centre to get the kids started.


The weaving went around first going over the top of the stick and then under: over 1, under 1, over 2, under 2 etc. We tried to tuck any joining thread ends to the back.


To finish I left a tail of wool to hang it up and tied a few knots. That was when the snow flake stopped being a snowflake and started being a kite. The kids took them outside and had a good run around.

25 June 2012

Sticker Book

My kids are always getting stickers, as rewards, or from the fruit shop, or from the school banking, or dentist. What ever they are, the kids love them. But the great question is what to do with them all that keeps the walls and furniture sticker free.
Miss 3 and I decided to make a sticker book. We took 4 pages of different coloured paper, and made them into a book in much the same way as the fairy book we made a few days ago; stapling to the outside from the centre of the book, folding over the staple ends, and covering the staple ends with sticky tape to stop them from catching on anything.


And then Miss 3 could happily stick stickers to her hearts content.

After a while I decided to get a bit educational on her, and add a counting activity. I drew some boxes and wrote a number under each box. She loved sticking the right number of stickers in each box and then she drew her own boxes with numbers on another page.


14 June 2012

Bottle Cap Stamps

I once saw an idea to stick foam stickers on bottle caps to make your own stamps. We didn't have any foam stickers left, but we did have the empty sheet that a set of foam stickers came on, so the whole family spent a happy morning chopping it up and sticking it in different shapes on bottle caps and then stamping with them. 


Speaking of bottle caps, I have a big teapot filled with lids which are used for everything from counting and sorting games, wheels on cardboard box cars, buttons on things that 3 year olds think need buttons, and even once as sushi on our very own sushi train. A wonderful versatile and free toy!

13 June 2012

Cornflour Salt Dough vs Cornflour Soda Dough

Cornflour Clay

I wanted to try making cornstarch dough after seeing the beautiful mushroom and beads by 5 Orange Potatoes. Her recipe calls for equal parts cornstarch, baking powder and water, mixed with half as much salt. That seemed like a lot of baking powder to me, so I searched around and found another cornstarch dough recipe for 2 parts salt to 1 part cornstarch plus water.

I decided to try and make both.

I was feeling a little lazy and so I didn't look up if it should be baking powder or bi-carb soda. In retrospect it was probably bi-carb soda, but seeing as I had more baking powder on hand, I used that. In the same way I assumed cornstarch was equivalent to cornflour. 

Both recipes were dead easy to make. The kids adored that it was fresh, home made and they helped to make it. Even better that they could keep and paint their creations when they dried.

The recipe with the baking powder was an opaque white colour (and a little dry and crumbly, I think I'd try and improve that next time). The cornstarch and salt dough had a beautiful slightly translucent white colour to it. I had a tiny paper cut on my finger, and working with the salt dough was like (to use a phrase) rubbing salt into a wound. Not very pleasant. Miss 3 had no problems with it, but I worried about the fingers of Mr 4 who suffers from eczema quite badly. The recipe with baking powder was not a problem and nice to work with.

In the photo above, the pink mushroom and balls were made using the salt dough, and the dolls house kitchen accessories and smaller mushroom were made with the baking powder recipe.

12 June 2012

Making a Wind Vane

We found this activity in a beautiful book "Feel the Wind" by Arthur Dorros. An excellent book for explaining what wind is to young children. 

We made this first wind vane together, and then the kids made a second one by themselves.

You need a pencil with an eraser, some cardboard, a pin and a straw.


Put them together, making sure you put the pin through the balance point of the arrow.


Take it outside and put it in the ground.


Using a compass, put rocks around to mark north, south, east and west.

08 June 2012

Magnetic Triangular Dominoes


I'm really happy with this magnetic triangular dominoes set I recently made. My kids have been enjoying using our Tantrix set, although it's a bit on the tricky side for Miss 3, and the pieces have a tendency to move around a bit when a new piece is added. I thought 3 sided dominoes would be perfect for them, especially if they were magnetic and therefore would stay where they were put (and give a satisfying click as they snap to the surface). And I just happened to have some old flat magnets that I was waiting to use to make something cool...

Instructions:
1. Take some old sheet magnets (our local real estate agents' advertising provide us with these free of charge :))

2. Glue a sheet of white paper on, to cover up any graphics on the magnet.

3. Print out some equilateral triangles (I used a free printable, and printed them at 250% size, so each triangle side is roughly an inch long). I used about 80 triangles.

4. Glue the triangles on the magnets.

5. Write all the combinations of 3 numbers on the triangles. E.g. [0,0,0] [0,0,1] [0,0,2] ... [0,1,1] [0,1,2] ... [1,1,1] [1,1,2] ... [5,5,5]

6. After a little experimentation I found I wanted to go back and make a second copy of all the triangles with 3 different numbers, with their numbers written counter-clockwise rather than clockwise. E.g. [1,2,3] compared to [1,3,2]. This makes it much easier to make a complete wheel from the pieces. Mr Crafty later told me he's played with a commercial version of this, and part of the fun and challenge of the game was that they didn't have the two versions of these tiles. That way if you did make a complete wheel it was a real achievement. This makes me wonder a little if the commercial version has been a little clever about which numbers to put where in these tiles. But for us, seeing as Mr 4 and Miss 3 are my target audience, I think it's much nicer to have the extra pieces.

7. Colour the numbers in. E.g. 0 = orange, 1 = red, 2 = yellow. Not really necessary, but lets face it, colouring can be a nice relaxing activity, and I have a soft spot for pretty coloured things.

8. Cut the triangles out.

9. Find a metal baking tray or metal surface to play on. We used our lovely Melissa and Doug magnetic chalk board, but for a great travel version you could also use a metal suitcase.

The kids (and their parents) really enjoy this one. And there even enough pieces to play two separate games at the same time. 

As an afterthought I covered them with small hexagonal pieces of clear contact paper. To protect them against wayward mothers who knock their glasses of water over on top of the pieces.. To do this, find a printout of hexagons e.g. this one, print it out to scale so that the triangle matches with 3 of the 6 corners from the hexagon, and wrap it on. A little fiddly, but it only took me an hour or so while I played a game with Mr 4 at the same time.


Related Posts Plugin for WordPress, Blogger...