Pages

Showing posts with label busy bag. Show all posts

07 June 2017

10 Best free busy bags for long haul flights

We've done multiple long haul flights (24+ hours) with our kids at various ages between 11mths and 9 years. Here are 10 of our favourite busy bags for the 1-3 years ages group, made using things from around the house:

1. Beach balls. Hands down BEST toys we've ever taken on a plane. We took two and and used them A LOT at the stop overs in Hong Kong airport. We had so many random kids join in or look longing at our family playing with them. Great for all ages 2 to 42!


2. Things in a bottle. First version was paper beads made from junk mail in a bottle. This was definitely the  favourite for our 13 month old. Second version was pipe cleaners in a spice bottle, which was more interesting for my 3 year old.


3. Letter writing. This is my 3 year old's favourite busy bag, plane or no plane. We made a bunch of tiny envelopes and packed them in a zip lock bag with some pens, stickers, little notebook and stamps. Hours of fun writing "letters" to all his favourite people. (note: Christmas cards can be a good source of little envelopes)

Free printable tiny envelope - just for you!

4.  Small bag of figurines. We used old trashies that the kids had mostly grown out of. They acted out all sorts of adventures in the plane seat.


5. Fishing game. Made with soy sauce fish with an old screw glued in the neck and a magnet.


6. Buttons and a toy ute (pick up truck) and digger. A little bag with a collection of old buttons, and matchbox size cars was a big hit. We include a pair of eyebrow tweezers for non-airport travel, making it great for fine motor control play!

7. Small box with loom bands and hook and different coloured box sections. Sort the loom bands by colour. Even better if you can find someone to take turns with!

8. Threading. Pipe cleaners and melty beads in different colours. Match the beads to the pip cleaners.


9. Books. Any little book that your child might like. We particularly like tiny Pixi books and Thomas and Friends.

10. Apps! Our favourites include Mini Sago, Dr Panda and Lego Duplo apps.


01 October 2012

Busy Roll Tutorial


I made a couple more busy rolls recently, and I'm really quite chuffed with how they turned out. These are an idea I came up with, sort of like a busy book or a quiet book, but only one page that can be rolled up and put in your handbag and then used when you're out for coffee or doing your groceries. You could put any activity you like on them, or have a couple of different rolls that you rotate through to keep your toddler interested. I filled the pockets with finger puppets, but you could put anything in that you think would interest your child; little cars, animals, dolls etc.

** Please note that there are small items on this, if they were to come loose, they could be a choking hazard.

So here's the tutorial:

1. Collect together some fabric scraps. 
I've used: 
a 20cm zip, 
2 larger rectangles of fabric, approx. 24cm x 30cm for the main body, 
2 smaller pieces of fabric approx. 24cm x 10cm for pockets, 
a strip of felt approx 24cm long and an inch wide, 
2 small pieces of felt to use at pocket flaps, maybe 3 x 1.5 inches. 
about 60cm of ribbon, 
3 buttons,
some velcro,
some string,
and some beads.

2. Lay the bits and pieces out and sort them until you're happy with the layout. Sew hems on the top of the pockets, and fold the bottom of the top pocket under and iron a crease into it.

3. Sew the zip to the top of the pocket.
4. Thread the beads onto the string and tie a firm knot in the string, making a loop long enough to go twice across your main fabric.


5. Cut slits on your long strip of felt. They need to be wide enough for your button to fit through, and should be spaced approx. 1 inch apart.


6. Sew a seam down the middle of you bottom pocket, fixing it to your large piece of fabric.


7. Sew a square of velcro/ hook and loop onto one side of the bottom pocket, and a matching square onto one of the felt pocket flaps.


8. Sew the two pocket flaps in place.

9. Sew a button onto the other side of the bottom pocket, and cut a slit through the pocket flap large enough for the button to fit through.


10. Sew a strip of ribbon on, sewing it down every inch or so. 
11. Sew the string firmly to the fabric, such that one half of the string winds its way back and forth under the ribbon, and the other half forms a straight line to the other side of the fabric.


12. Sew the top side of the zip down, and the bottom side of the zip pocket.
13. Sew a button firmly onto a piece of ribbon which is approx 30cm (i.e. longer than your fabric is wide).
14. Sew the ribbon and felt strip in place.


15. Sew a small strip of ribbon to the top of your fabric, with the loop pointing down (I forgot to do this before the next step, hence the shot looking inside the inverted busy roll).


16. Place your backing material over your fabric with all the activities on it, right sides facing in. Pin and sew together. leaving a hand sized gap at the bottom.


16. Turn right sides out, and roll it up to find the right spot to sew a large button on the backing fabric. The top loop will hook over this button to keep the roll closed.


17. Sew the bottom of the fabric together.


18. Finished!

If you make your own, I'd love to hear about it.

11 June 2012

Crayon Bag

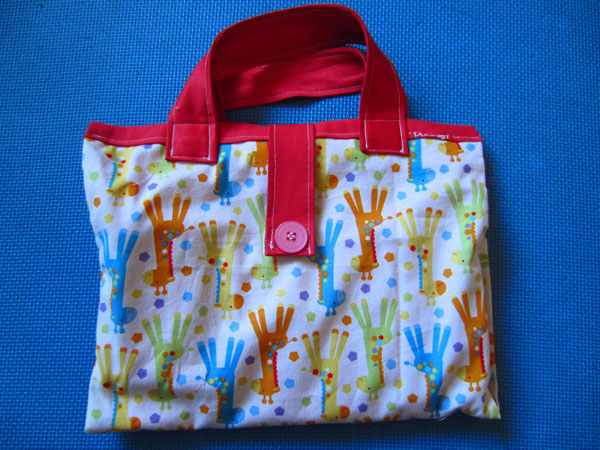
A carry bag I made for a set of Crayola dry-erase crayons and the black/white board they came with. The button is purely decorative, with velcro behind it. This is because it was a present for a 2 y/o girl, and I thought velcro would be easier for her to manage. Hopefully she won't mind that the giraffes are upside-down on the front of the bag!


08 June 2012

Magnetic Triangular Dominoes


I'm really happy with this magnetic triangular dominoes set I recently made. My kids have been enjoying using our Tantrix set, although it's a bit on the tricky side for Miss 3, and the pieces have a tendency to move around a bit when a new piece is added. I thought 3 sided dominoes would be perfect for them, especially if they were magnetic and therefore would stay where they were put (and give a satisfying click as they snap to the surface). And I just happened to have some old flat magnets that I was waiting to use to make something cool...

Instructions:
1. Take some old sheet magnets (our local real estate agents' advertising provide us with these free of charge :))

2. Glue a sheet of white paper on, to cover up any graphics on the magnet.

3. Print out some equilateral triangles (I used a free printable, and printed them at 250% size, so each triangle side is roughly an inch long). I used about 80 triangles.

4. Glue the triangles on the magnets.

5. Write all the combinations of 3 numbers on the triangles. E.g. [0,0,0] [0,0,1] [0,0,2] ... [0,1,1] [0,1,2] ... [1,1,1] [1,1,2] ... [5,5,5]

6. After a little experimentation I found I wanted to go back and make a second copy of all the triangles with 3 different numbers, with their numbers written counter-clockwise rather than clockwise. E.g. [1,2,3] compared to [1,3,2]. This makes it much easier to make a complete wheel from the pieces. Mr Crafty later told me he's played with a commercial version of this, and part of the fun and challenge of the game was that they didn't have the two versions of these tiles. That way if you did make a complete wheel it was a real achievement. This makes me wonder a little if the commercial version has been a little clever about which numbers to put where in these tiles. But for us, seeing as Mr 4 and Miss 3 are my target audience, I think it's much nicer to have the extra pieces.

7. Colour the numbers in. E.g. 0 = orange, 1 = red, 2 = yellow. Not really necessary, but lets face it, colouring can be a nice relaxing activity, and I have a soft spot for pretty coloured things.

8. Cut the triangles out.

9. Find a metal baking tray or metal surface to play on. We used our lovely Melissa and Doug magnetic chalk board, but for a great travel version you could also use a metal suitcase.

The kids (and their parents) really enjoy this one. And there even enough pieces to play two separate games at the same time. 

As an afterthought I covered them with small hexagonal pieces of clear contact paper. To protect them against wayward mothers who knock their glasses of water over on top of the pieces.. To do this, find a printout of hexagons e.g. this one, print it out to scale so that the triangle matches with 3 of the 6 corners from the hexagon, and wrap it on. A little fiddly, but it only took me an hour or so while I played a game with Mr 4 at the same time.


14 May 2012

Cut and Paste People

Never underestimate the appeal of cutting up a piece of paper and sticking it on other piece of paper.

On this occasion we cut parts of people out of an advertising flier and Miss 3 stuck them together on a plain piece of paper.

30 April 2012

A Busy Roll

Quiet Book

I had been eyeing off some beautiful busy books, but I wanted to try something that I could make in one morning, and was more easy to post to a friend or fit in a handbag.

This was the result. A busy roll. There are two pockets at the bottom, one velcro shut, one snap shut. A lacing activity with felt and a ribbon and button, a zip (which leads to no-where, much to the kids disappointment.) and some pony beads on a string maze.

The loops were a bit small on the string maze to start with, but the kids thought it looked appealing, and especially loved the pockets and the lacing.


Related Posts Plugin for WordPress, Blogger...