Pages

Showing posts with label craft. Show all posts

19 August 2012

Homemade Puff Paint

We've been a little light on the sharable kinds of craft here recently. I've been very busy making things for a fundraiser market, and the kids have been doing little side projects with whatever I've been using. But today I was searching for something to do at playgroup craft next week, and stumbled across this one, which I just had to have a go at. It's no good for our playgroup as we don't have a microwave there, but perfect for a quiet afternoon at home.


We made our own home made puff paint, using SR flour, salt and food colouring, according to the recipe from One Crafty Mumma. We made it into a sludgy paste, and painted on ordinary paper. We then put the painting in the microwave on high for 20 to 30 seconds. Magic! Dry, puffy paintings. The thicker you apply the paint, the more puff.


It even was interesting enough that it enticed Mr 5 to do not one but two paintings.

18 June 2012

Pirate Accessories


Some simple accessories can turn a mundane morning into a pirate adventure. Grab the trusty washing-basket boat, make a treasure map, and off you go!

24 May 2012

Suncatchers

Once again I was inspired by one of my favourite blogs, MiniEco. This time we made sun catchers. The kids had a great time, although didn't always get the concept of gluing things on the back-side of the black paper, and Miss 3 struggled with the idea of covering the holes, preferring instead to glue paper around them. But we all had fun doing it. The kids also loved it when I cut out their names, and filled them with different colours. We used a combination of tissue paper and cellophane, because that's what we had in house.

20 May 2012

Homemade Wooden Jigsaw Puzzle


One day I was reading a board book to the kids about different tools, and trying to tell them about a jigsaw. Suddenly I decided the best (although perhaps not the quickest) way to teach them this was to make our own jigsaw.

I got a scrap piece of MDF, and we drew our pictures on in pencil. We each painted our own objects in the picture, and when the paint was dry, outlined the shapes with a black marker pen.

We took the picture outside and I cut it up with a jigsaw (while the kids mostly ignored me, except for occasionally asking me if it was ready yet). When it was all done, and dusted off, we got do do our own puzzle! 

It was a bit tricky to do as my inexperienced jigsawing made the pieces quite a loose fit, but that was definitely outweighed by the pleasure we had of making it ourselves.

18 May 2012

Coloured Sand

This is one we made for a birthday present for a little boy who loves craft (although I made sure there would be some leftovers for us to play with).

We got some sand from the sandpit, and sifted out anything large. We divided it into five approximately equal amounts and put it in large freezer bags. We then added food colouring and shook the bags until everything was bright. We poured them into dishes to dry. Finally we bought some cheap salt and pepper shakers and added the sand, ready for making sand pictures.

We also did some coloured rice at the same time, using the same method.

As you can just see at the top of the photo, the kids had a very hard time keeping theirs hands away from it.

15 May 2012

Butterfly Craft

I saw this being done at the local museum a while back, and adults and kids of all ages were all really enjoying it.
Draw (or trace) an outline of half a butterfly, with a dashed fold line down the centre.
Fold the paper down the fold line, and cut around the butterfly outline

Punch a hole in the centre of the fold line

Cut shapes from coloured paper and glue them on to decorate your butterfly. You could also use pens, paint, glitter, stickers, etc.

Take a chenille stick and twist it to give a finger-sized hole

Thread the legs of the chenille stick through the hole in the centre of the butterfly. The finger loop should be on the plain side of the butterfly.

At the head end of the butterfly, fold the chenille stick over the edge of the paper
Top side
Bottom side

Ready to fly!


14 May 2012

Cut and Paste People

Never underestimate the appeal of cutting up a piece of paper and sticking it on other piece of paper.

On this occasion we cut parts of people out of an advertising flier and Miss 3 stuck them together on a plain piece of paper.

13 May 2012

Plane Activity Tray

We are planning on taking the kids on a long trip later this year. It will involve almost 60 hours of planes and airports, 6+ hours of trains, and a wedding reception, amongst other things. I'm not terribly worried (although a little more worried now that I add it all up and write it down in black and white) as I'm sure I can plug the kids into various electronics for most of that... but where's the challenge in that?

So I have been trawling the Internet looking for activities and ideas that can make the trip more enjoyable.

One thing that I saw and really liked the look of was an activity tray. I also liked the look of this table cover. I am still plotting a way to combine the two, but first I wanted to have my own attempt at an activity tray.

My guidelines were something slimline that could potentially fold behind the tray on multiple different types of aircraft, and yet a tray that was as big as possible. Preferably something big enough to fit the food tray on, so no knives and forks would be making a dash for the floor.

This is what I came up with:
Plane activity tray, Mark I.

I took the dimension of the aeroplane tray table to be roughly 24cm x 42cm.
 
I chose sides for the tray to be 3cm on the back and sides, but I wanted a lower front (2cm), so the kids wouldn't have to hold their hands so high to reach things. 

I took an old drop mat and cut it to size leaving 1cm around the edge to sew (so I cut a rectangle of 32cm by 50cm). I then took pieces of old laminated paper and cut them into 4 pieces; 2 to fit the sides (24cm x 3cm), and 2 to fit the back (21cm x 3cm). The back was made from two pieces, not one, as I wanted to leave a gap in the middle of the back so that the tray could be folded smaller than an a4 page, and easily fit into a backpack. I made sure the laminate pieces were a fraction on the small size so that they wouldn't interfere with any folding lines. I then folded the edge of the drop mat over (1cm) and sewed the laminated paper in place.
 
For the front edge I glued a fine strip of batting along and folded the edge over and sewed it into place. Again I left a gap in the batting in the middle of the front edge for easy folding. This made the tray more comfortable to lean wrists on and yet stiff enough to provide an edge. I am worried however that it also makes it too bulky to fit behind a closed tray.

Plane activity tray, folded in half ready to carry

The corners were the tricky bit. I had originally planned to use velcro, but the velcro I had was such poor quality, and the size of the corners was so small, it just didn't grip well enough. So (thanks to some inspiration from Mr Crafty) I decided to sew a loop of ribbon a little way from the corner, which the folded corner can be neatly tucked under. In the next prototype I think I'd use elastic instead of ribbon to made it even easier. To make the front corner a little easier I prefolded the top corner down and stitched it in place.
 
Front corner, folded
Back corner, folded

Front corner, unfolded
Back corner, unfolded
We then trialled the finished product at the dinner table, as a drawing tray and also as a bead threading tray. It worked well, although it didn't managed to catch strings of beads that were dropped half a meter away from it...

Edit: I made a second one with some improvements. Find it here.

12 May 2012

Paper Flowers

I was decorating an outdoor space ready for a birthday party recently. We really wanted to hang some balloons but didn't have any on hand, and so we decided to try our hands at making something with paper instead. We wanted something that we could hang up and that would sway in the wind a little.

I had been looking at these beautiful paper tulips and thought that was a good place to start. We had two things to consider: that we only had white paper available, and how would we hang them? We decided a yellow flower center would look nice and add colour.

To make the yellow centre, we took a tissue and dipped two sides in watered down yellow food colouring. The tissues were then hung up to dry for a couple of hours. When they were dry, we tied string around the centre of the tissue so that it looked like a bow, and threaded the string through a hole in the bottom of the flower. We made 3 different sizes of flower to add some variation, and hung them around in small bunches.

If anyone uses this idea, I'd love to see what improvements and variations you come up with.

07 May 2012

Making a Tree

This is such a simple and satisfying craft activity. So much so, that this time Miss 3 came up with the plan herself while we were out walking. Both kids collected leaves. I drew them a simple trunk shape on a big piece of paper, and then they spent a happy half hour gluing leaves on.

We even used a corner of an egg carton for the glue pot and cotton buds for glue sticks, so the tidy up time was minimal.

03 May 2012

Marble Maze

This idea came from Teach Preschool . We cut up an old cake box, and used sticky tape to stick the straws down. I initially started with just an arrow at the start and finish, but Mr 4 needed a bit more of a challenge, and so together we put numbered dots in 6 different corners. This time he had to try and roll the marble to each number in the right order. This made it very appealing to him, so much so, he took it for show and tell to school.

Meanwhile Miss 2 enjoyed cutting the straws into millions of small pieces.

01 May 2012

Super Hero Armbands

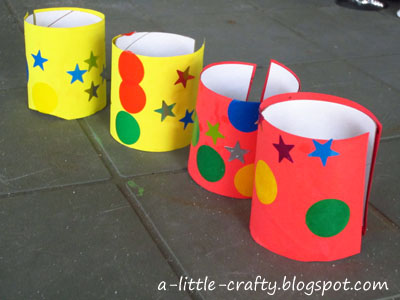
A nice little craft activity to do with the kids. Take a cardboard roll. Cut it lengthways, and then cut it in half around the middle. Cover it in some bright coloured paper, and let the kids loose with some stickers.


Best for fine days when the kids can use their new-found super powers outdoors.
Related Posts Plugin for WordPress, Blogger...