Pages

Showing posts with label activity. Show all posts

05 October 2012

Airplane Activity Tray, Take 2

So I thought I'd have a second go at the airplane activity tray to go on the tray table of the plane. This should help the kids keep occupied on our upcoming long haul flights, and help to stop toys, pens, pages, forks etc. making a dash for the floor.


I had been eying off the vinyl table cloth in the shop with roads on it, but it was so expensive, and I already had perfectly good plastic at home... so I decided to turn the trays over and draw my own road. My own? Well, a bit of a co-operative effort with the kids.

Here's how I did it:

A piece of vinyl (I used an old kids splash mat) 32cm x 50cm.
4 pieces of something more firm (I used some laminated paper). 2 need to be 3cm x 24.8cm, and the second 2 are 3cm x 21cm.
Some elastic and some velcro.

Measure 2 cm from the corners, draw a triangle and cut it off. This makes the corner less bulky when folded.


Turn the plastic over, measure half way along the long edge. Place the two shorter strips of laminated paper 1cm from the edge and close to the centre line (but not overlapping so you can fold the tray in half to store/carry). Use sticky tape to hold it in place.


Sew it down, folding over the plastic as you go.


Position the longer laminated paper strips on the short side of the plastic. They should be about 1cm from the edge, but take care that they are corner to corner with the strips you've already sewed on, without overlapping. See the fine read lines in the picture above for my attempt to show this. If they overlap, you won't be able to neatly fold up the sides of the tray.


To make the front edge of the tray, take a small left over strip of plastic (about 3cm x 21cm) and roll it into a small roll (or something else soft, on my first version I used wadding, but it was a bit messy). Tape it in place on the front edge, again leaving a gap at the centre line for folding. Fold over the front edge about 1.5cm and sew it down.


Cut small strip of elastic about 5cm long. Sew one end on the inside of the tray, close to the end of laminated paper strip. I did it on the side wall, but it would also work on the back wall. Sew the other end to the back of the tray at the other edge of the laminated paper strip.


When you assemble the tray, pinch the corner into a triangle and tuck it under the elastic. 

On the front side of the tray, fold over the corner and sew down (it would have been slightly better to sew right down to the corner like I did first time). Sew a 3cm strip of elastic across the end of the laminated paper strip.

When you fold this corner it, it makes a little triangle that can be slipped under the elastic.

To attach the tray to the plane tray table, I sewed on 4 strips of elastic to the back side. I sewed them slightly inside the laminated paper strips. This makes them on slightly inside the edge of the bottom area of the tray when assembled. (This means if the plane tray table is slightly smaller than expected the activity tray should still sit nicely.) Sew the elastic strips so they are pointing outwards. Sew a rectangle of velcro (hook and loop) to the other end of each piece of elastic.

I decided this would be best because:
1. it seemed simple to do, 
2. it gave me two ends so I could adjust the length of the straps a bit to cater for different sized tables, 
3. I can open them up and twist them around the back arms to the tray table if needed and 
4. I can open them up and push them to the side if I want to use the activity tray on a train or table.


Finished the sewing, now to decorate.


First I roughed out the outline using lead pencil. I only had a black and a red permanent marker in house, so I used them (Mr 5 insisted the roads should be red on his). I then used an eraser to remove any unwanted pencil lines.

We then found (after trying all the felt tipped pens and finding they all rubbed off) that pencil coloured in beautifully, and wouldn't wipe off with a wet cloth (although can mostly be rubbed off with an eraser), and so the kids could add some extra colour to the pictures.

01 October 2012

Busy Roll Tutorial


I made a couple more busy rolls recently, and I'm really quite chuffed with how they turned out. These are an idea I came up with, sort of like a busy book or a quiet book, but only one page that can be rolled up and put in your handbag and then used when you're out for coffee or doing your groceries. You could put any activity you like on them, or have a couple of different rolls that you rotate through to keep your toddler interested. I filled the pockets with finger puppets, but you could put anything in that you think would interest your child; little cars, animals, dolls etc.

** Please note that there are small items on this, if they were to come loose, they could be a choking hazard.

So here's the tutorial:

1. Collect together some fabric scraps. 
I've used: 
a 20cm zip, 
2 larger rectangles of fabric, approx. 24cm x 30cm for the main body, 
2 smaller pieces of fabric approx. 24cm x 10cm for pockets, 
a strip of felt approx 24cm long and an inch wide, 
2 small pieces of felt to use at pocket flaps, maybe 3 x 1.5 inches. 
about 60cm of ribbon, 
3 buttons,
some velcro,
some string,
and some beads.

2. Lay the bits and pieces out and sort them until you're happy with the layout. Sew hems on the top of the pockets, and fold the bottom of the top pocket under and iron a crease into it.

3. Sew the zip to the top of the pocket.
4. Thread the beads onto the string and tie a firm knot in the string, making a loop long enough to go twice across your main fabric.


5. Cut slits on your long strip of felt. They need to be wide enough for your button to fit through, and should be spaced approx. 1 inch apart.


6. Sew a seam down the middle of you bottom pocket, fixing it to your large piece of fabric.


7. Sew a square of velcro/ hook and loop onto one side of the bottom pocket, and a matching square onto one of the felt pocket flaps.


8. Sew the two pocket flaps in place.

9. Sew a button onto the other side of the bottom pocket, and cut a slit through the pocket flap large enough for the button to fit through.


10. Sew a strip of ribbon on, sewing it down every inch or so. 
11. Sew the string firmly to the fabric, such that one half of the string winds its way back and forth under the ribbon, and the other half forms a straight line to the other side of the fabric.


12. Sew the top side of the zip down, and the bottom side of the zip pocket.
13. Sew a button firmly onto a piece of ribbon which is approx 30cm (i.e. longer than your fabric is wide).
14. Sew the ribbon and felt strip in place.


15. Sew a small strip of ribbon to the top of your fabric, with the loop pointing down (I forgot to do this before the next step, hence the shot looking inside the inverted busy roll).


16. Place your backing material over your fabric with all the activities on it, right sides facing in. Pin and sew together. leaving a hand sized gap at the bottom.


16. Turn right sides out, and roll it up to find the right spot to sew a large button on the backing fabric. The top loop will hook over this button to keep the roll closed.


17. Sew the bottom of the fabric together.


18. Finished!

If you make your own, I'd love to hear about it.

20 July 2012

Plane Trip Bingo 3, 4 and 5

Here are a few slightly trickier plane trip bingo sheets I've made and thought I'd share. They're free to download, although I do appreciate comments :). 

Here's a plane scavenger hunt of moderate difficulty I've made. Download it from here.


And a second hunt of moderate difficulty. Download the free printable from here.


Here's another slightly more difficult one. Download a free printable from here.


Or go to the other Plane Trip Bingo games. 


17 July 2012

Plane Trip Bingo 2


Here's another Plane Trip Bingo that's perfect for those weary times after a meal, but before your tray is cleared. Download the pdf Here.

Or go to the other Plane Trip Bingo games.

10 July 2012

A Fairy Playground

After being inspired by the amazing fairy gardens other people have created, I decided we should have a go at our own.

I cleared a corner of our overgrown vegie garden and started making a little house. Miss 3 took one look at it and declared it was too dirty for her fairies, so we found a grassy patch and started again.


We collected stones and shells for the kitchen area and flowers for the house, I made a swing from some twigs and cotton thread and then the kids set to making a whole obstacle course, complete with straw trampoline, balancing beam, slippery slide, tunnel and sandpit.


Finally we got ourselves some fairies to play with in their new home, by sticking paper wings onto some Lego Friends dolls. 


Not as elegant as the other gardens I'd seen, but definitely heaps of fun and imagination.

09 July 2012

Paperclip Chains


You can't get an activity much simpler than this. Paperclip chains (or necklaces or bracelets or houses) can be a pleasant way for the children to occupy themselves on a rainy day.


05 July 2012

Soda and Vinegar Colours


Another rainy day to fill with inside play. This time we chose a science experiment I saw on Homemade Serenity. The idea is simple, cover a tray in Bi-carb of Soda, fill some containers with different coloured vinegar and let the kids slowly drop the vinegar on the bi-carb.

They loved it! 

First (because we didn't have any eye-droppers in house) I taught the kids how to lift up liquid using a straw with their finger on the end. That's a nice little experiment in itself. I gave them two cups, one full of water and one empty, and asked them to try and fill the empty cup.

While they were doing that I set up the tray with bi-carb and vinegar. It was definitely something I wanted to supervise for, as there was a tendency to get a bit messy (it could be nice to do on a summer day outside).

Not only did they get to see the bubbling chemical reaction, but they could also experiment with colour mixing.


29 June 2012

Marshmallow Building

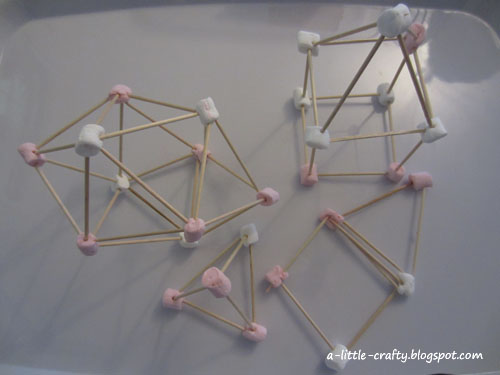
I've seen marshmallow and toothpick construction around a bit on the internet, and we just so happened to have some mini marshmallows in the house, a bunch of toothpicks, and yet another rainy day on our hands.

It was so much fun!

Marshmallow and Toothpick Constructions
The marshmallows were just sticky enough, and firm enough and yet pliable enough to make really satisfying structures.

I started with a tetrahedron (triangular based pyramid), and then a house, and then something else made from more triangles and satisfyingly symmetric.


Miss 3 at first struggled to get the hang of it. She managed to get a lot of cotton bud type constructions, and then, with a bit of help she made a 2-D house. With a bit more help she started on 3-D structures that (in Mr Crafty's opinion) didn't worry too much about the laws of gravity.

Mr 5 instinctively started making things with lots of triangles, and had no problem building something big and fairly stable. He struggled more with not eating too many marshmallows.

We kept the structures until after dinner, and then broke them up and ate desert at the same time.

25 June 2012

Sticker Book

My kids are always getting stickers, as rewards, or from the fruit shop, or from the school banking, or dentist. What ever they are, the kids love them. But the great question is what to do with them all that keeps the walls and furniture sticker free.
Miss 3 and I decided to make a sticker book. We took 4 pages of different coloured paper, and made them into a book in much the same way as the fairy book we made a few days ago; stapling to the outside from the centre of the book, folding over the staple ends, and covering the staple ends with sticky tape to stop them from catching on anything.


And then Miss 3 could happily stick stickers to her hearts content.

After a while I decided to get a bit educational on her, and add a counting activity. I drew some boxes and wrote a number under each box. She loved sticking the right number of stickers in each box and then she drew her own boxes with numbers on another page.


Related Posts Plugin for WordPress, Blogger...