Pages

Showing posts with label buttons. Show all posts

01 October 2012

Busy Roll Tutorial


I made a couple more busy rolls recently, and I'm really quite chuffed with how they turned out. These are an idea I came up with, sort of like a busy book or a quiet book, but only one page that can be rolled up and put in your handbag and then used when you're out for coffee or doing your groceries. You could put any activity you like on them, or have a couple of different rolls that you rotate through to keep your toddler interested. I filled the pockets with finger puppets, but you could put anything in that you think would interest your child; little cars, animals, dolls etc.

** Please note that there are small items on this, if they were to come loose, they could be a choking hazard.

So here's the tutorial:

1. Collect together some fabric scraps. 
I've used: 
a 20cm zip, 
2 larger rectangles of fabric, approx. 24cm x 30cm for the main body, 
2 smaller pieces of fabric approx. 24cm x 10cm for pockets, 
a strip of felt approx 24cm long and an inch wide, 
2 small pieces of felt to use at pocket flaps, maybe 3 x 1.5 inches. 
about 60cm of ribbon, 
3 buttons,
some velcro,
some string,
and some beads.

2. Lay the bits and pieces out and sort them until you're happy with the layout. Sew hems on the top of the pockets, and fold the bottom of the top pocket under and iron a crease into it.

3. Sew the zip to the top of the pocket.
4. Thread the beads onto the string and tie a firm knot in the string, making a loop long enough to go twice across your main fabric.


5. Cut slits on your long strip of felt. They need to be wide enough for your button to fit through, and should be spaced approx. 1 inch apart.


6. Sew a seam down the middle of you bottom pocket, fixing it to your large piece of fabric.


7. Sew a square of velcro/ hook and loop onto one side of the bottom pocket, and a matching square onto one of the felt pocket flaps.


8. Sew the two pocket flaps in place.

9. Sew a button onto the other side of the bottom pocket, and cut a slit through the pocket flap large enough for the button to fit through.


10. Sew a strip of ribbon on, sewing it down every inch or so. 
11. Sew the string firmly to the fabric, such that one half of the string winds its way back and forth under the ribbon, and the other half forms a straight line to the other side of the fabric.


12. Sew the top side of the zip down, and the bottom side of the zip pocket.
13. Sew a button firmly onto a piece of ribbon which is approx 30cm (i.e. longer than your fabric is wide).
14. Sew the ribbon and felt strip in place.


15. Sew a small strip of ribbon to the top of your fabric, with the loop pointing down (I forgot to do this before the next step, hence the shot looking inside the inverted busy roll).


16. Place your backing material over your fabric with all the activities on it, right sides facing in. Pin and sew together. leaving a hand sized gap at the bottom.


16. Turn right sides out, and roll it up to find the right spot to sew a large button on the backing fabric. The top loop will hook over this button to keep the roll closed.


17. Sew the bottom of the fabric together.


18. Finished!

If you make your own, I'd love to hear about it.

24 July 2012

Flower Glasses Brooch


This little glasses brooch is a design that originated from my Grandmother. She cleverly made one for herself years ago, using a brooch she had, which conveniently had a loop that she could fit a key ring onto. Unfortunately the brooch broke and was unrepairable, and she couldn't find any new brooches that she could fit her key ring to. I thought that sounded like a very satisfying little craft project and got to work. The basic idea is a brooch with a small key ring loop that you slip one leg of your glasses through, so that you can hang your glasses on your shoulder and easily find them next time you need them. 

The thing I like coming up with is the pretty bits. For this brooch I wanted to make a white flower.

First I got some pretty white material. I cut a rectangle of the material approx. 10cm x 15cm. I carefully melted the edges a little with a lighter to stop it from fraying (taking care to not set anything on fire!). I've worked with this material making a skirt a while back, and I know how easily it frays.


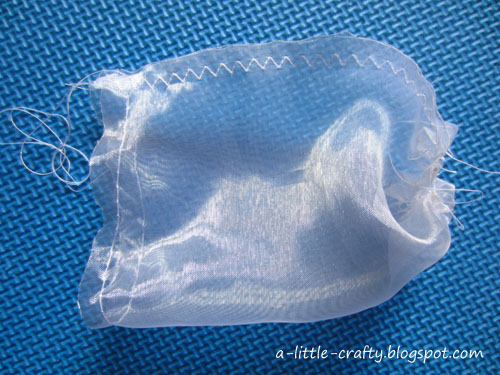
Next I sewed the two ends of the rectangle together with a zigzag stitch to make a loop. I sewed in two running stitches at the top and bottom of the loop (long stitch length and no doubling back to secure the thread at the ends) to use for gathering . 


I turned the loop right side out, so the zigzag stitch was inside the loop, and sewed another running stitch to gather the fabric across the middle.


I pulled the running stitches until the fabric was nicely gathered and looking reasonably flowery, then tied the threads in a knot and used hot melt glue to glue a button on top, securing everything in place.


Next I took a length of white ribbon, just long enough to allow the key ring to peak out from the bottom of the flower, and melted the ends of the ribbon to stop it fraying.

Finally, using a hot melt glue gun, I turned the flower over and glued the ribbon (with ring) in place and the brooch pin over the top of it.

Finished.

16 July 2012

Simple Hairclips

More hot glue gun fun, and a couple of new hair clips. To make the flower clip it was a matter of roughly cutting out a flower shape from two matching colours, I used red felt and pink fleece (because I had them). I then trimmed the pink flower until it was a little smaller than the red, and then glued it all onto the clip with a matching button. Done!


To make the pink bow I simply folded the ribbon back and forwards a few times. I put a couple of quick stitches in to keep it firm. Finally I wrapped it around the middle with the tail end of the ribbon and glued it all in place. Too easy.

03 June 2012

A Homemade I-Spy Book

I have been eyeing off the beautiful home made i-spy books like this one from Delia creates. I wanted to add some of my own home-made i-spy pages to the restaurant/travel dry-erase books I've been making, but when I'd finished the pages I put them in a $1 photo album and really liked it. Perhaps I'll laminate them and put them in the travel book later.


It was such a simple project. Just get a collection of toys, spread them out on a plain background so that you can see everything, and make a photo. I carefully didn't make them too cluttered and busy, because the kids find that too difficult and loose interest (see my post on i-spy bags). I then chose 5 or 6 objects to photograph, this time making sure that there was enough space around each object that I would be able to crop them into a smaller image. I then put them together with a little rhyme of up to eight other things to find.

Mr 4 likes to read the rhymes, and Miss 3 has the pictures she can match. The kids loved helping me do it. Although of course, true to the nature of children, the help made the project much more challenging. After printing I noticed that one of the search-for pictures showed a pram that Miss 3 had taken out of the dolls house to be play with at a crucial moment. The project took several days to make 10 puzzles (there was something about spreading out a nice collection of toys on the floor that meant they needed to be played with for a couple of hours). The last one we did, Mr 4 gathered all the things, spread them out and helped with the rhyme. He loved seeing his own toys, especially his sticker-reward chart, which was filled with all sorts of different stickers.

02 May 2012

Button Shirts

I bought a bag of mixed buttons to do the tree shirt that Becced pointed out on Pinterest. I cut the tree shape from some old pants, did zigzag sewing around the edges (after first using straight stitch to hold it in place), and then sewed on as many buttons as I could before school pick up time. Kids are fascinated with the buttons on this one.

Seeing as I still had the rest of the bag of buttons and another plain t-shirt, I decided to do a fish. I sketched fish shapes on plain paper until I was happy with it, then used it as a template to cut out the fabric. Again I straight stitched and then zigzag stitched the fish in place. Finally I sewed on some blue buttons for bubbles, and one for an eye.
Related Posts Plugin for WordPress, Blogger...