Pages

29 July 2012

Non-Newtonian Fluids


Cornflour gloop is always a bit of fun. Put some cornstarch in a bowl, add water and colour, get messy. We also played treasure hunt, where I hid some small things in the mix, and the kids had to find them. Then, just for the educational side I talked about how this was an unusual (non-Newtonian) fluid because the faster you move it, the harder it gets.


26 July 2012

Fairy Flip Flops


Miss 3 came to me with this idea to make her thongs (a.k.a. flip flops) into "fairy thongs". First we selected a bunch of ribbons and I used a lighter to carefully melt the ends to stop them from fraying. I tied one ribbon around the front strap of the shoe, on both sides of the toe piece (making a rough figure 8 shape). We then threaded the ribbons through that first ribbon and tied them in a knot. 


Note: If you find these come untied too often, try tying each ribbon separately.

25 July 2012

Toilet Roll Doll's Dresses


The other day the kids wanted to make some dolls to act out some stories using the story box Miss 3 and I had made. We made toilet paper roll dolls, and I thought I'd share how I made their very quick and very easy dresses.

1. Cut a strip of paper from an A4 sheet, the full length of the sheet, and about 10cm wide.
2. Fold it in half.
3. Cut a small slit at one end, about the width you'd like the dolls arm to be. 
4. Fold the paper below the cut over, making a triangle, and sticky tape in place.

5. Slip the toilet paper roll into the dress to measure how far to make the arm cut on the opposite side, and then cut it.

6. Fold the lower corner over and sticky tape it in place, in the same way as before.

7. Cut a small scoop for a neckline.

8. Put the dress on the toilet roll, and draw a face on.

Mr 5 thought they needed legs too.

24 July 2012

Flower Glasses Brooch


This little glasses brooch is a design that originated from my Grandmother. She cleverly made one for herself years ago, using a brooch she had, which conveniently had a loop that she could fit a key ring onto. Unfortunately the brooch broke and was unrepairable, and she couldn't find any new brooches that she could fit her key ring to. I thought that sounded like a very satisfying little craft project and got to work. The basic idea is a brooch with a small key ring loop that you slip one leg of your glasses through, so that you can hang your glasses on your shoulder and easily find them next time you need them. 

The thing I like coming up with is the pretty bits. For this brooch I wanted to make a white flower.

First I got some pretty white material. I cut a rectangle of the material approx. 10cm x 15cm. I carefully melted the edges a little with a lighter to stop it from fraying (taking care to not set anything on fire!). I've worked with this material making a skirt a while back, and I know how easily it frays.
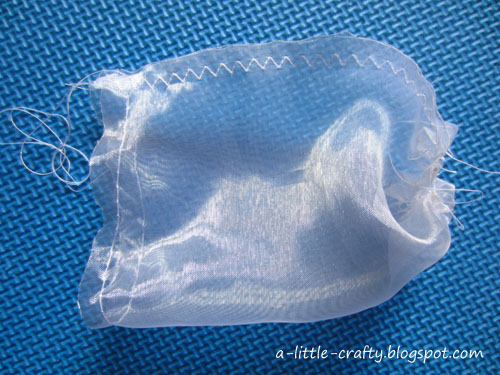

Next I sewed the two ends of the rectangle together with a zigzag stitch to make a loop. I sewed in two running stitches at the top and bottom of the loop (long stitch length and no doubling back to secure the thread at the ends) to use for gathering . 


I turned the loop right side out, so the zigzag stitch was inside the loop, and sewed another running stitch to gather the fabric across the middle.


I pulled the running stitches until the fabric was nicely gathered and looking reasonably flowery, then tied the threads in a knot and used hot melt glue to glue a button on top, securing everything in place.


Next I took a length of white ribbon, just long enough to allow the key ring to peak out from the bottom of the flower, and melted the ends of the ribbon to stop it fraying.

Finally, using a hot melt glue gun, I turned the flower over and glued the ribbon (with ring) in place and the brooch pin over the top of it.

Finished.

23 July 2012

Nature Printing

Miss 3 had decided to collect some things from the garden, and so I got out the paints so we could paint pictures of them. We put all our colours on the plate (red, yellow, blue, green and white) and carefully mixed the other colours we needed in order to paint the flowers she'd collected. As usual, as we painted the colours got slowly spread out, and mixed together and the hand painting started.


Towards the end of the hand painting, we had a tray of semi-mixed colours, and so we decided to do some prints of the garden things. I had been wanting to do this for a while after reading this post from 2 Craft and 2 Create. However I wasn't feeling enthusiastic enough to get cardboard to glue things on to and we had no paint rollers around. Instead we just pressed the leaves and flowers into the spread out paint on the paint plate, and pressed them onto the paper.


The leaves made a beautiful pattern (and quite different depending on which side of the leaf you used). The lavender made a pretty splodge and at the same time smelled fantastic.


22 July 2012

Growing Salt and Sugar Crystals

Salt Crystals
Sugar Crystals
The other day Mr 5 asked to do one of the experiments in his science book (Awesome Experiments, by Trevor Cook). We didn't follow the instructions exactly, but the general essence was dissolve sugar in hot water and dissolve salt in hot water, put a string in each solution and wait for crystals to form on the string. The book told us we could use hot tap water that hadn't been boiled.

First we set up our cups. I broke a wooden skewer and tied some string around it (this stops it from rolling off the side of the cup), while Mr 5 labelled which cup was which. Then we stirred as much sugar or salt into the liquid as we could (a little at a time until it would no longer dissolve in the water.)


Then we waited and waited and waited. About 2 weeks. Eventually the salt wicked up the string and formed some not very impressive blobby white crystals. The sugar worked better and eventually gave us some pretty sparkly crystals.
Sugar Crystals

I've done the salt before, but always by stirring the salt into a boiling pot of water. The increased temperature allows the water to super-saturate (dissolve more salt than it could have at a lower/room temperature). So I decided to give that a go. This time around I also used cotton thread on the skewers, to minimise wicking. 


Within an hour we had crystals forming, and by the next day it was finished.

Salt Crystals

I had never made the sugar crystals before and was a little disappointed to find they made crystals with a fairly square structure, like the salt. I was hoping they would be a very different shape so that we could talk about molecular structure a bit. But apart from that it was a very satisfying experiment.

20 July 2012

Plane Trip Bingo 3, 4 and 5

Here are a few slightly trickier plane trip bingo sheets I've made and thought I'd share. They're free to download, although I do appreciate comments :). 

Here's a plane scavenger hunt of moderate difficulty I've made. Download it from here.


And a second hunt of moderate difficulty. Download the free printable from here.


Here's another slightly more difficult one. Download a free printable from here.


Or go to the other Plane Trip Bingo games. 


19 July 2012

2 Dresses and a Nappy

I am just discovering how easy it is to sew clothes (as long as you're not too fussy if the end result is not exactly what you had in mind). This week I set out to sew Miss 3 a singlet top out of some cute panda material. I wanted to use a simple pattern so I had a quick look at the tutorials from Prudent Baby, and Random Nicole and then set to work. I was a bit too generous in my sizes and made a dress instead of a top, but neither Miss 3 or I were too worried about that. 

The great thing about this dress was that the largest triangles that were cut off, made a scrap of the perfect size to make a new matching dress for her baby doll. I used the same pattern, just seriously scaled down.


However once baby had a new dress on it was obvious she also needed a nappy, so I used a piece of lovely soft material to make her a modern cloth nappy. 


17 July 2012

Plane Trip Bingo 2


Here's another Plane Trip Bingo that's perfect for those weary times after a meal, but before your tray is cleared. Download the pdf Here.

Or go to the other Plane Trip Bingo games.

16 July 2012

Simple Hairclips

More hot glue gun fun, and a couple of new hair clips. To make the flower clip it was a matter of roughly cutting out a flower shape from two matching colours, I used red felt and pink fleece (because I had them). I then trimmed the pink flower until it was a little smaller than the red, and then glued it all onto the clip with a matching button. Done!


To make the pink bow I simply folded the ribbon back and forwards a few times. I put a couple of quick stitches in to keep it firm. Finally I wrapped it around the middle with the tail end of the ribbon and glued it all in place. Too easy.

15 July 2012

Plane Trip Bingo


I noticed that there are plenty of scavenger hunts out there for road trips, but not so much for in a plane. So here's a scavenger hunt I made for in a plane and thought I'd share. It should be relatively easy. Download the Plane Trip Bingo here (for free, although I always appreciate a comment!)

Or see one of my other plane scavenger hunts:
Meal Time Plane Bingo
3 Somewhat Tricky Plane Bingos


12 July 2012

Ruffled Flower Hair Clip


This week I finally bought myself a hot glue gun. So much fun! As soon as I got home I made some new hair clips for Miss 3. This one was made using this tutorial. It was dead easy. 

I used a shiny slippery material that I knew (from making the ruffled skirt) frays really easily. So I started by gently melting the edges of my circles with a lighter. I have found from clips I've bought that hot melt glue can sometimes not stick well to shiny metal surfaces, so I then wrapped a short piece of ribbon around the clip and glued it in place, to help everything stick more firmly. After that I just followed the instructions in the tutorial, folding each circle into quarters and gluing it in place.


11 July 2012

Weather Collage for a Story Box

This time our inspiration came from Inner Child Fun. Miss 3 took one look at their lovely spring branch picture and said "I'd like to do that, can we do that, please?"

So we started with a sunset picture.

And a green leaves picture. With pink mountains.

From there she got more creative, with a rainy sheep picture and a couple of snowy pictures.

Next we stuck them all on a story box, one picture on each side of the box. The idea is that you turn the box around while you tell the story. We used toys to act out the characters in the story.


10 July 2012

A Fairy Playground

After being inspired by the amazing fairy gardens other people have created, I decided we should have a go at our own.

I cleared a corner of our overgrown vegie garden and started making a little house. Miss 3 took one look at it and declared it was too dirty for her fairies, so we found a grassy patch and started again.


We collected stones and shells for the kitchen area and flowers for the house, I made a swing from some twigs and cotton thread and then the kids set to making a whole obstacle course, complete with straw trampoline, balancing beam, slippery slide, tunnel and sandpit.


Finally we got ourselves some fairies to play with in their new home, by sticking paper wings onto some Lego Friends dolls. 


Not as elegant as the other gardens I'd seen, but definitely heaps of fun and imagination.
Related Posts Plugin for WordPress, Blogger...