Pages

24 September 2012

Restaurant Bag/ Travel Activity Bag

We are planning on doing some travelling this year, including a long haul flight or two, and a wedding, and a few more trips of 6+ hours, with a 3 and 5 year old. 

I previously made a tray to go on a plane tray table, and I'd been planning on making a bag that would hang on the back side of the tray. In the end I decided not to go with that for a few reasons: I think that doing a bit of bending and stretching for a bag under a seat every few hours would probably do our circulation some good, I don't think the passenger in the seat in front of us wants a bag full of books banging against the back of their chair, the chair is too far away for kids to easily reach, and I want something a bit more versatile that can be used as a restaurant bag as well.

What I did want:
A zip! So I can be sure that nothing precious is going to escape from the bag while it's under a seat.
A bag big enough to fit a large activity book or colouring book easily.
Potentially a bag that's big enough to quickly stuff every loose animal, car, and pack of tissues into it at the end of a flight.
A shoulder strap which can also be used to hook the bag over the corner of a restaurant chair.

I'm not an amazing sewer, in fact I'm very new to zips and they tend to scare me a bit. But here's what I did. If you've got a suggestion for how it can be done better, just add a comment. :)


1. Cut a piece of material a couple of inches bigger on all sides than the book or folder you want to fit in there. The zip in the picture is 30cm. Cut a strip about 10cm x 70cm for the shoulder strap.


2. Fold over the top seam and iron in place.

3. Fold over the side seam (both front and back fabric together) and iron.
 4. Fold the two sides in for the shoulder strap, and then fold it in half along the length. Iron.


5. Pin the zip to one side of the top and sew in place. Make sure the outside of the zip faces the outside of your fabric. 

6. Sew only up to where you earlier ironed in the side seam crease (mark this spot with a pin if it's a bit tricky to see)

7. Sew the other side of the zip on.

8. Sew up the side seams to the top
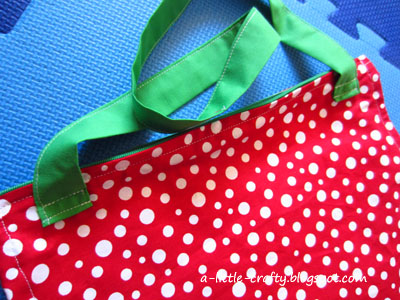

9. Sew the handle together on the open side, and then sew the handle onto the back side of the bag.


10. Admire your work!


In the end I couldn't resist adding a little pocket. It's just big enough for a little pencil box, but mostly I just did it for looks.


23 September 2012

Home Made Weather Station


This was a super activity to start the school holidays with. Mr 5 is doing lots of weather at school, and loving it, and so they were both very keen to make their own weather station . We got the free printables from Mr Printables, I laminated them (with the thought they'd be up for a while and probably revisited when Miss 3 does weather at school), and then I did most of the cutting out and assemblng while the kids ran around the house imagining all sorts of wild weather.

The chart leaves you with a pile of cards for the "Today is" section. The kids have been keen to learn how to use my sewing machine, so they both sewed super simple bags for the extra cards, and then stapled the bag to the chart.

Thaumatrope


Making a Thaumatrope is a fun little activity perfect for a rainy day or holiday. All you need is some paper, sticks (I used kitchen skewers) and a bit of imagination. 

The classic picture is a bird and a cage. Draw the bird on one piece of paper, a bird cage on another and stick them together around a stick. When you spin the stick, the two pictures seem to merge together and the bird appears to be in the cage.

I tried a few more, a face and some face paint, and a tree and it's leaves. Miss 3 concentrated on her passions: butterflies and rainbows.


16 September 2012

Nature Prints in Air Dry Clay


I had some air dry clay left over from another project and wanted to give some nature prints a go. I remember seeing them previously here. Now that I look at them and compare them again, I see that my edges are more rustic. But they were definitely fun to make, and should work nicely for a Christmas tree ornament or piece of jewelry. Next time I'd like to try this recipe for home-made air dry clay. Just as soon as I figure out what school glue is, and where to buy it.


Miss 3 also enjoyed this craft and had great fun making her own circles and impressions. We rolled a small ball of clay in our hands, and then pressed it flat using a milk bottle top. We put the leaf on the clay and again pushed it in using the milk bottle top. We poked a hole using a toothpick and then left them to dry.


Once dry they could be painted. They could also be used to make some interesting rubbing drawings.


Related Posts Plugin for WordPress, Blogger...